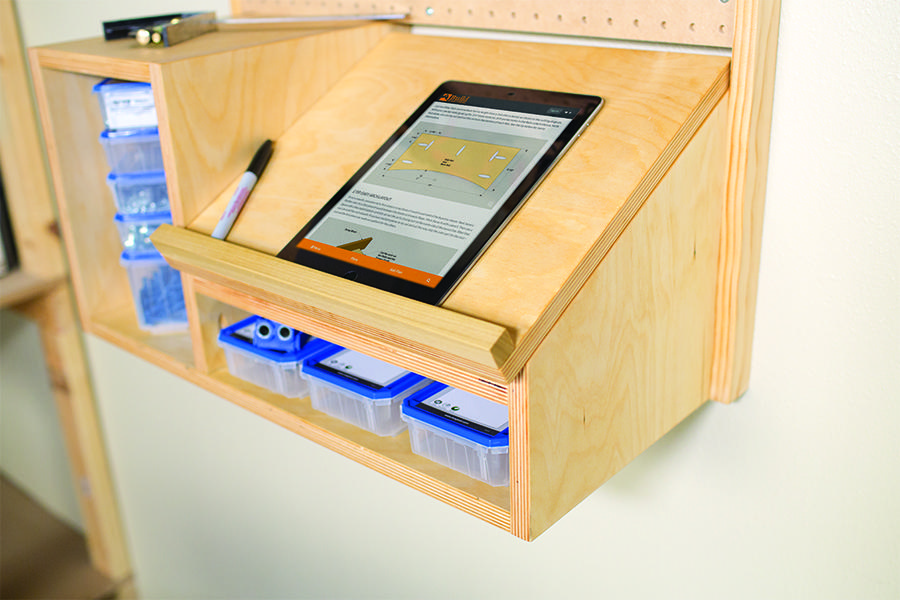
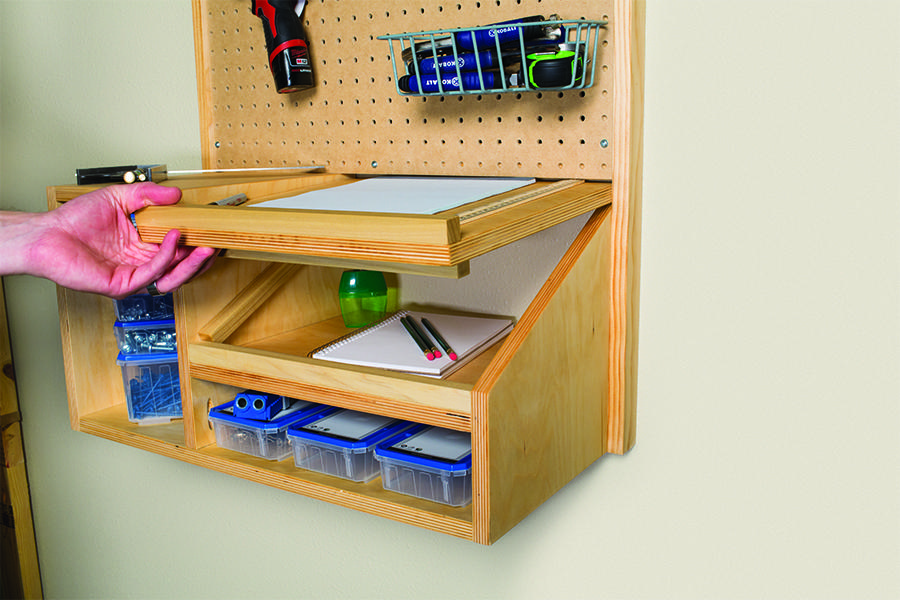


Keeping your workspace organized storing tools is always a challenge, but small tools can be especially challenging. This storage center gives all those tools a home, with a pegboard hanging area and storage shelves. Plus, there’s a handy desk surface to hold a tablet or notes while you work.
Tools
Kreg Tools

Other Tools
-
drill/driver

-
right-angle drill attachment
-
3" square-drive bit
-
circular saw
-
hammer
-
tape measure
-
sander
Materials
Wood Products
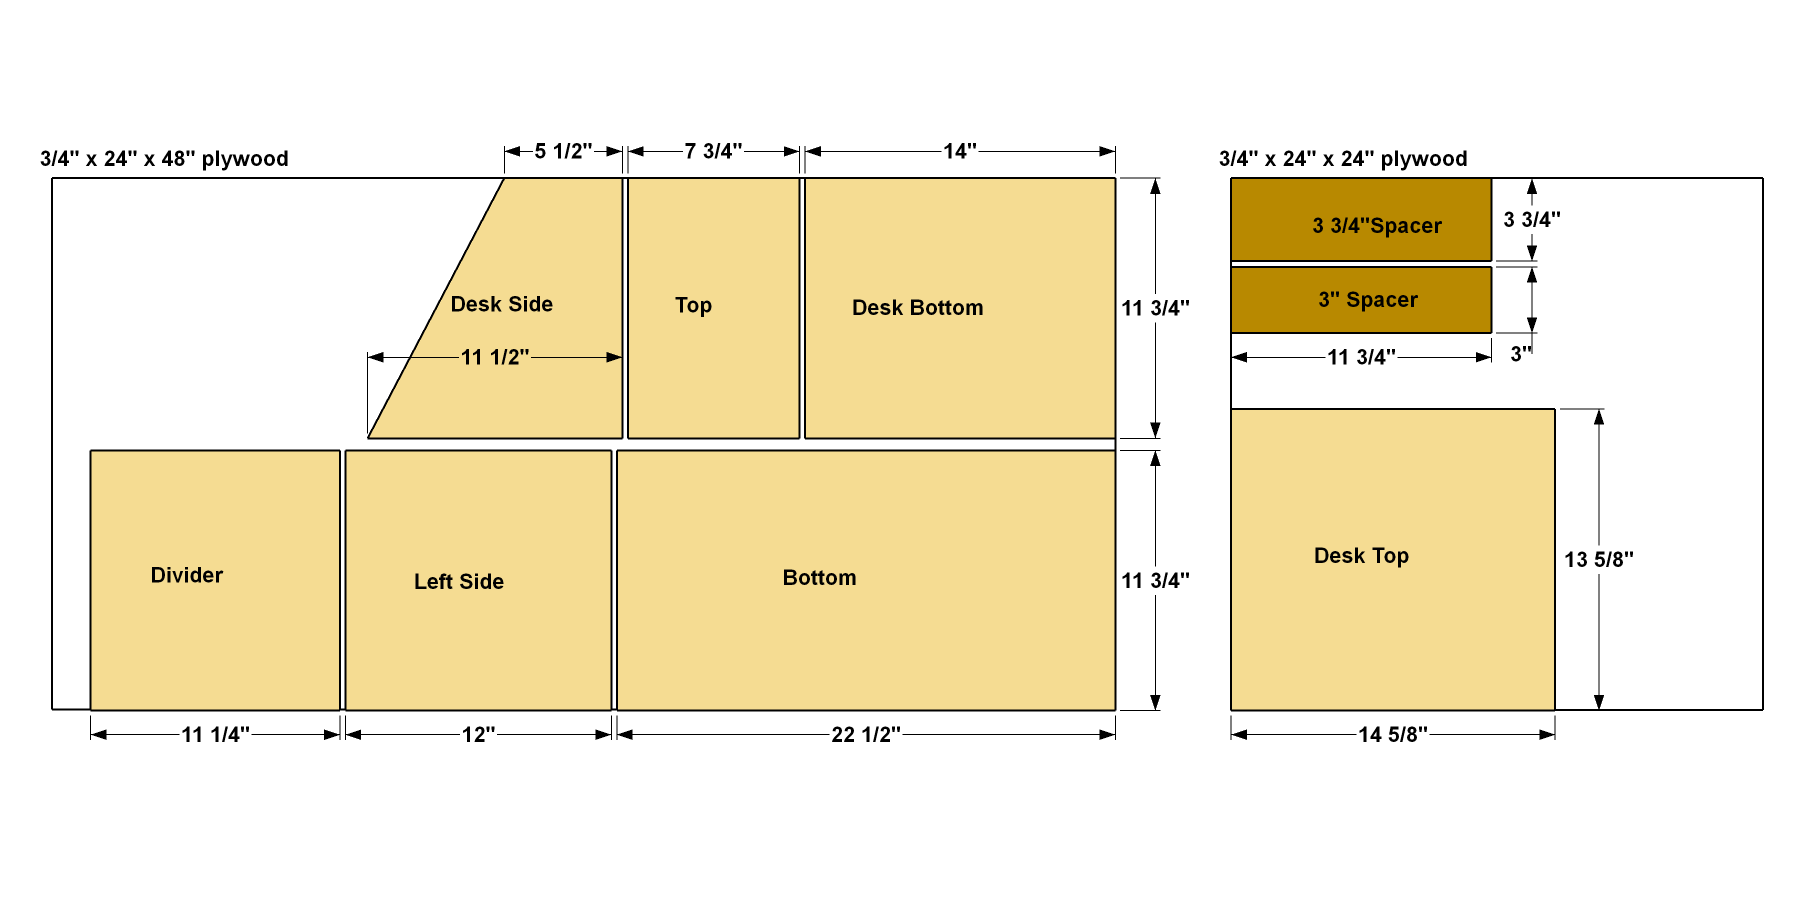
- 1 Plywood , 3/4" x 24" x 48"
- 1 Plywood , 3/4" x 24" x 24"
- 1 Pegboard , 1/4" x 24" x 48"
- 2 Pine , 1x2 x 96"
- 4 Square dowel , 3/4" X 3/4" x 36"
Hardware & Supplies
- 30 1 1/4" coarse-thread Kreg Pocket-Hole Screws
- 8 1" coarse-thread Kreg Pocket-Hole Screws
- 12 1 1/2" brad nails
- 16 1 1/4" flat-head wood screws
- 1 18" Hangman Hanging System
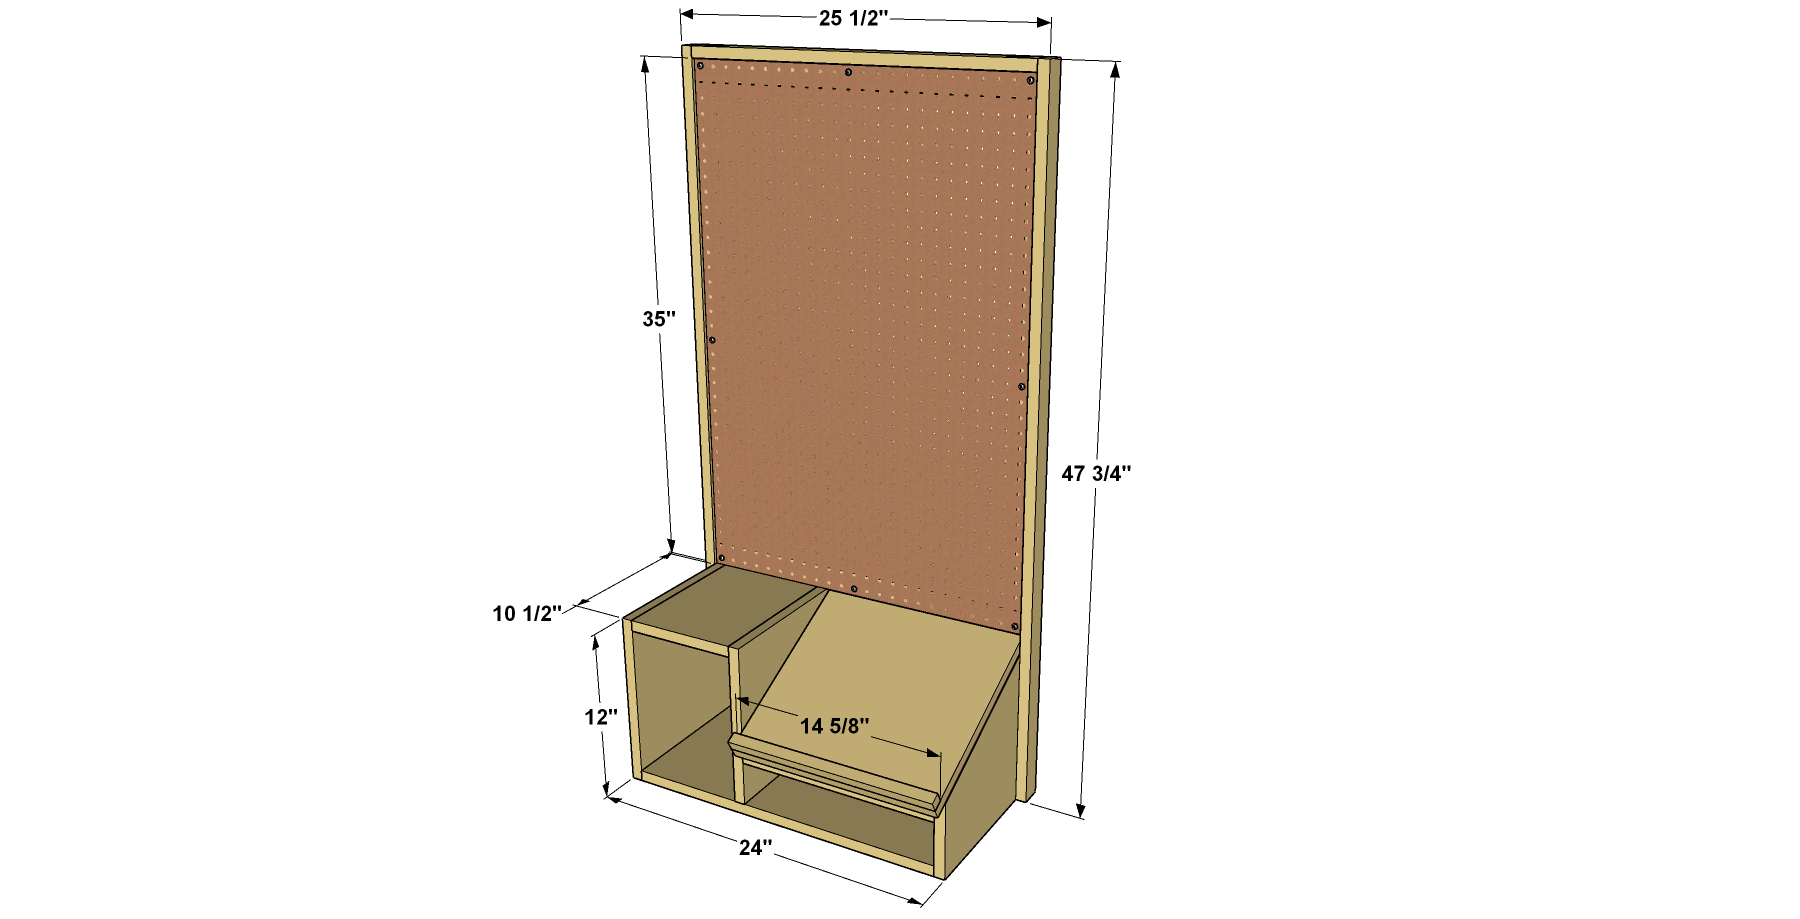
Cut List & Parts
- 1 Left Side , 3/4" x 11 3/4" x 12"
- 1 Top , 3/4" x 11 3/4" x 7 3/4"
- 1 Divier , 3/4" x 11 3/4" x 11 1/4"
- 1 Desk Side , 3/4" x 11 3/4" x 11 1/2"
- 1 Desk Bottom , 3/4" x 11 3/4" x 14"
- 1 Bottom , 3/4" x 11 3/4" x 22 1/2"
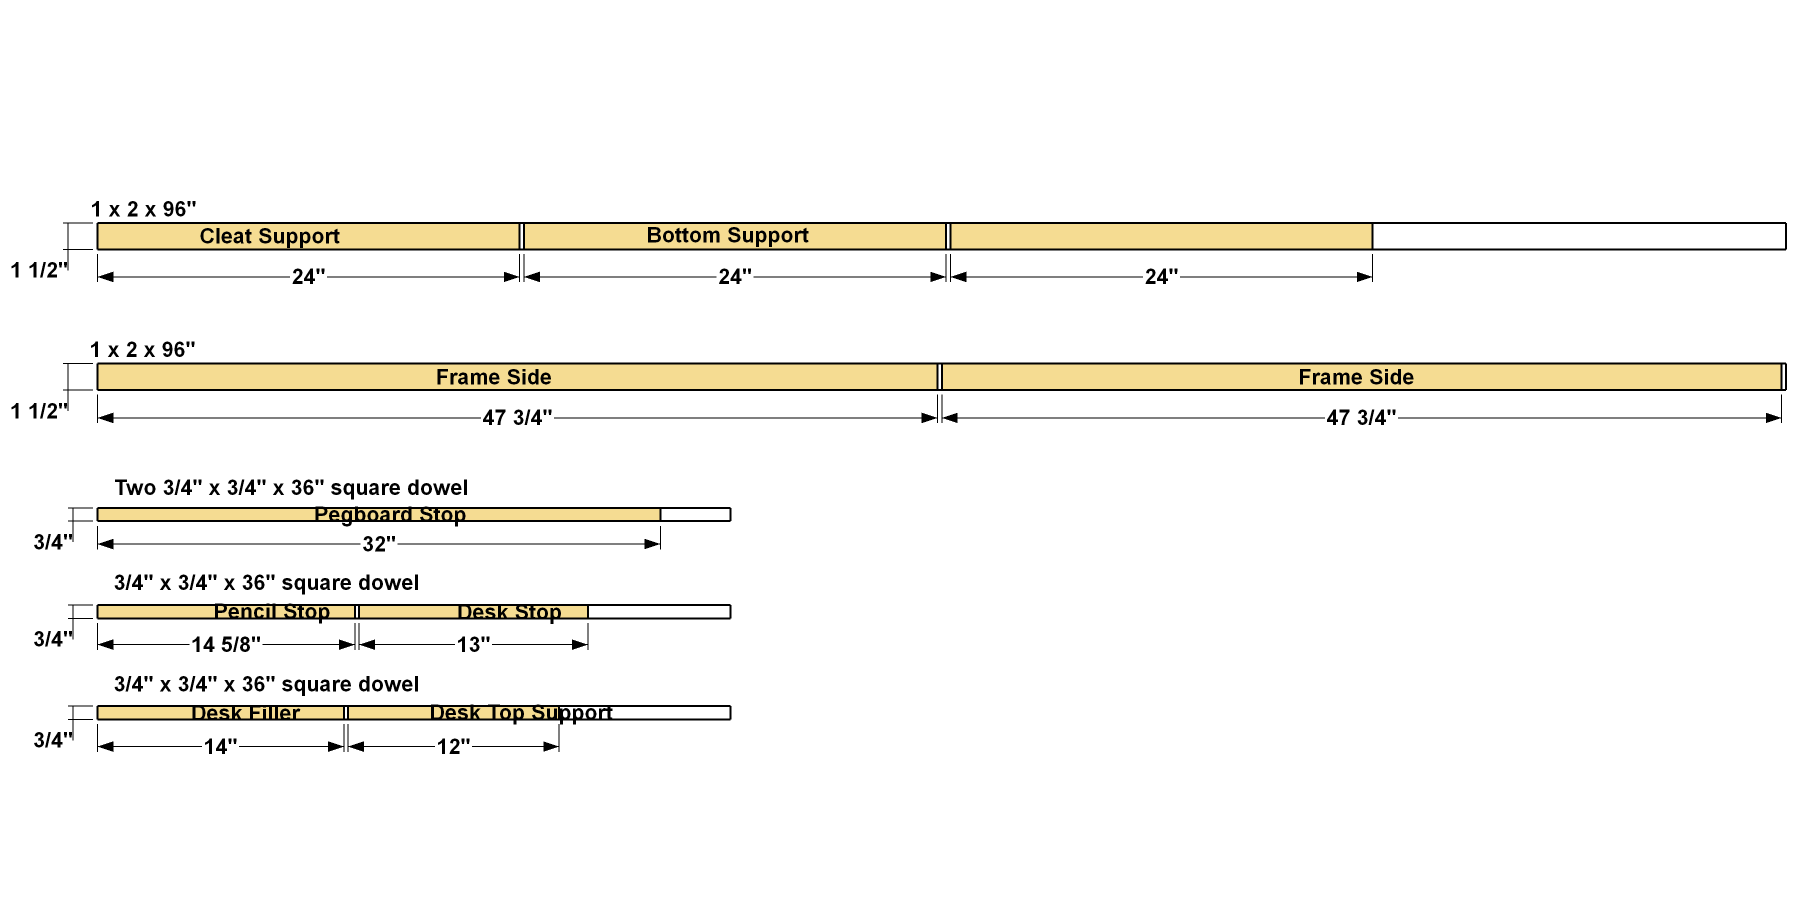
- 1 Desk Top Support , 3/4" x 3/4" x 12"
- 1 Desk Top , 3/4" x 14 5/8" x 13 5/8"
- 1 Desk Filler , 3/4" x 3/4" x 14"
- 1 Pencil Stop , 3/4" x 3/4" x 14 5/8"
- 1 Desk Stop , 3/4" x 3/4" x 13"
- 2 Frame Side , 3/4" x 1 1/2" x 47 3/4"
- 1 Frame Top , 3/4" x 1 1/2" x 24"
- 1 Frame Bottom , 3/4" x 1 1/2" x 24"
- 1 Cleat Support , 3/4" x 1 1/2" x 24"
- 2 Pegboard Stop , 3/4" x 3/4" x 32"
- 1 Pegboard , 1/4" x 24" x 35"
- 1 3" Spacer , 3/4" x 3" x 11 3/4"
- 1 3 3/4" Spacer , 3/4" x 3 3/4" x 11 3/4"

Directions
-
Cut the Left Side, Top, and Divider
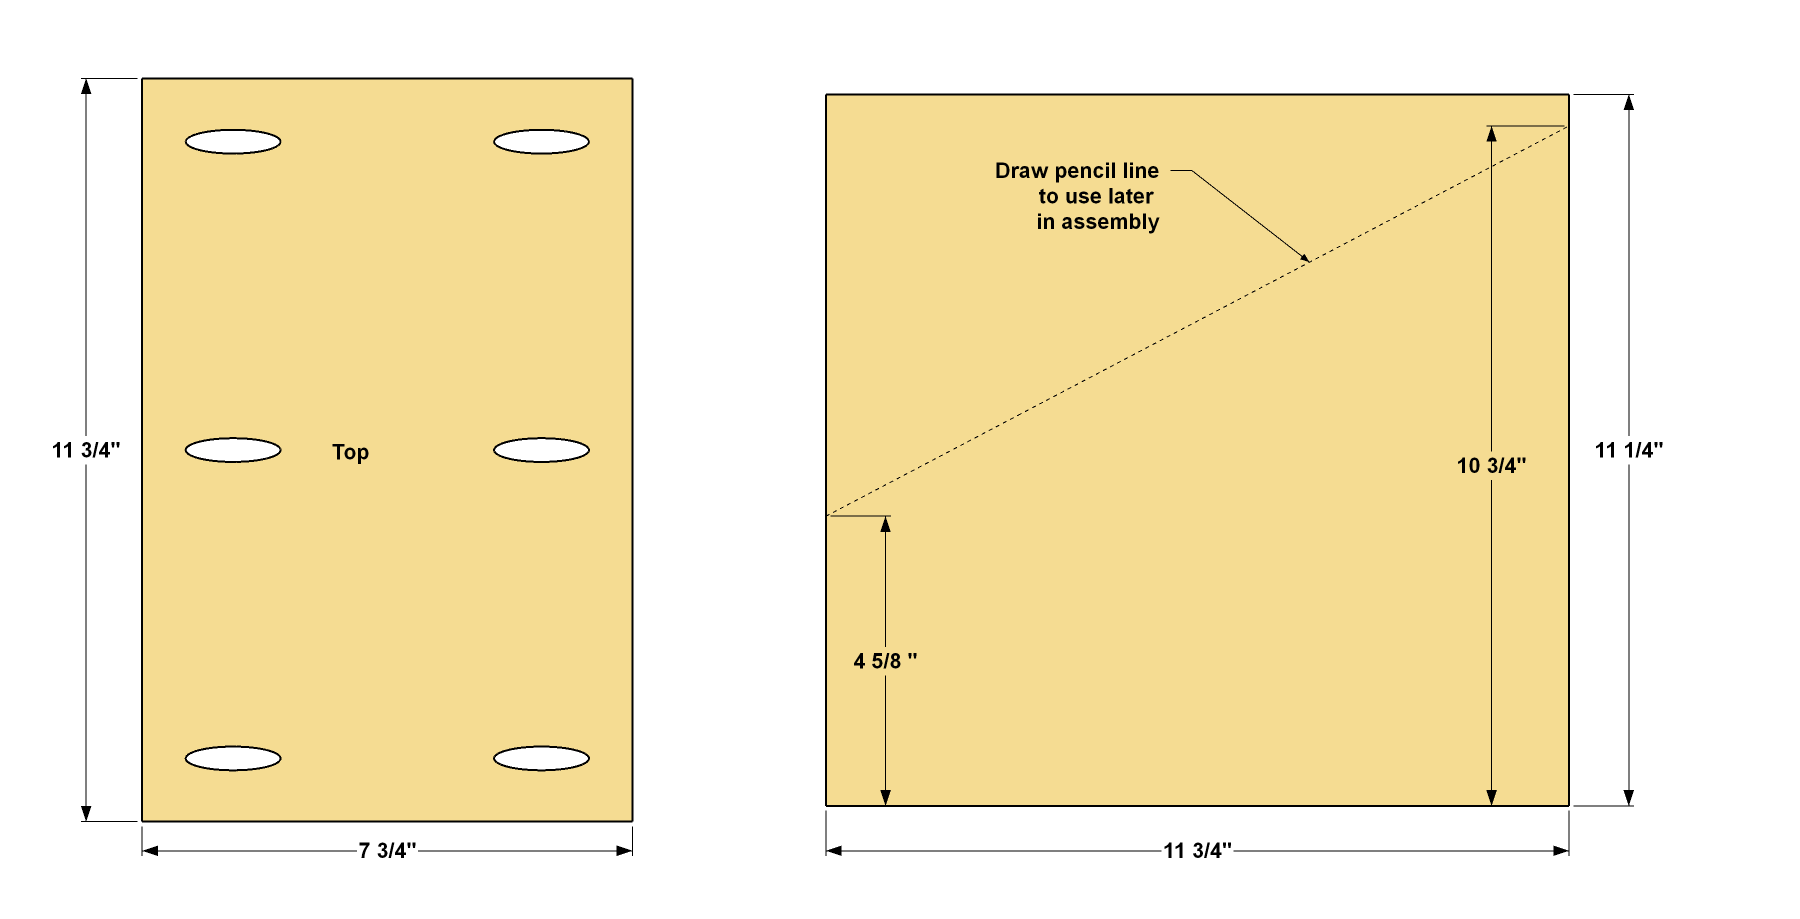
Cut the Left Side, Divider, and Top to size from 3/4" plywood, as shown in the cutting diagram. Set your Kreg® Pocket-Hole Jig for 3/4"-thick material, and then drill pocket holes in the Top at the locations shown. At this time, make a reference line with a pencil on one side of the Divider as shown. This will serve as a guide for positioning the Top Support in a later step.
-
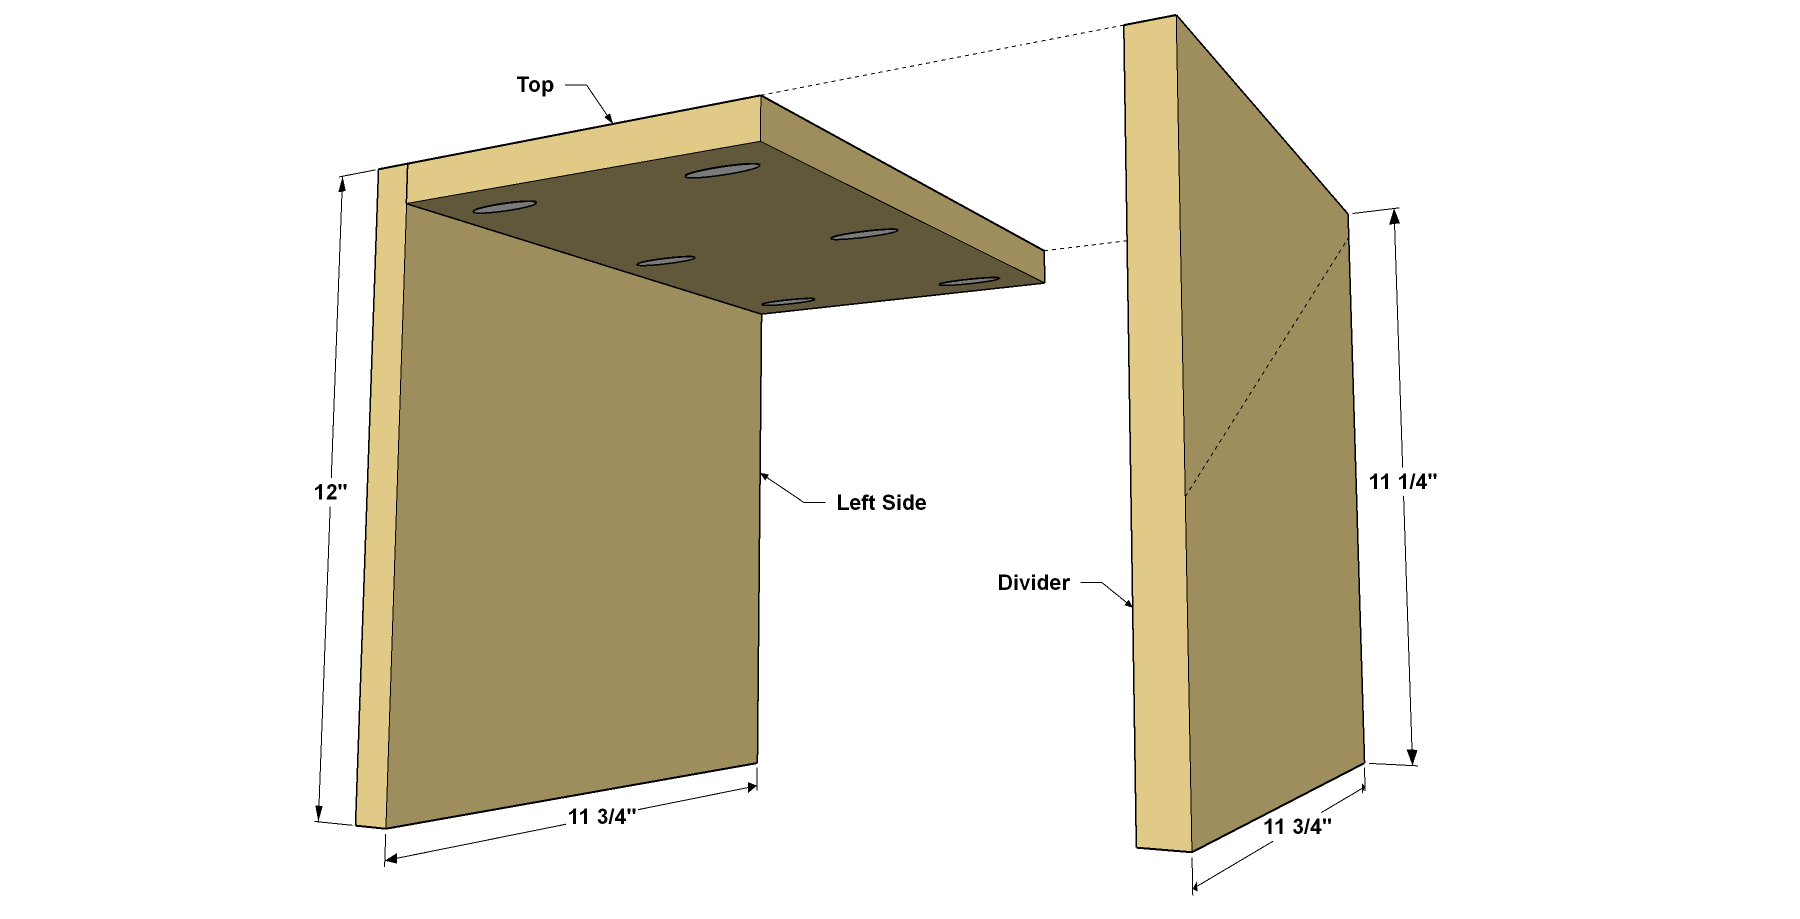
Assemble the Side, Divider, and Top
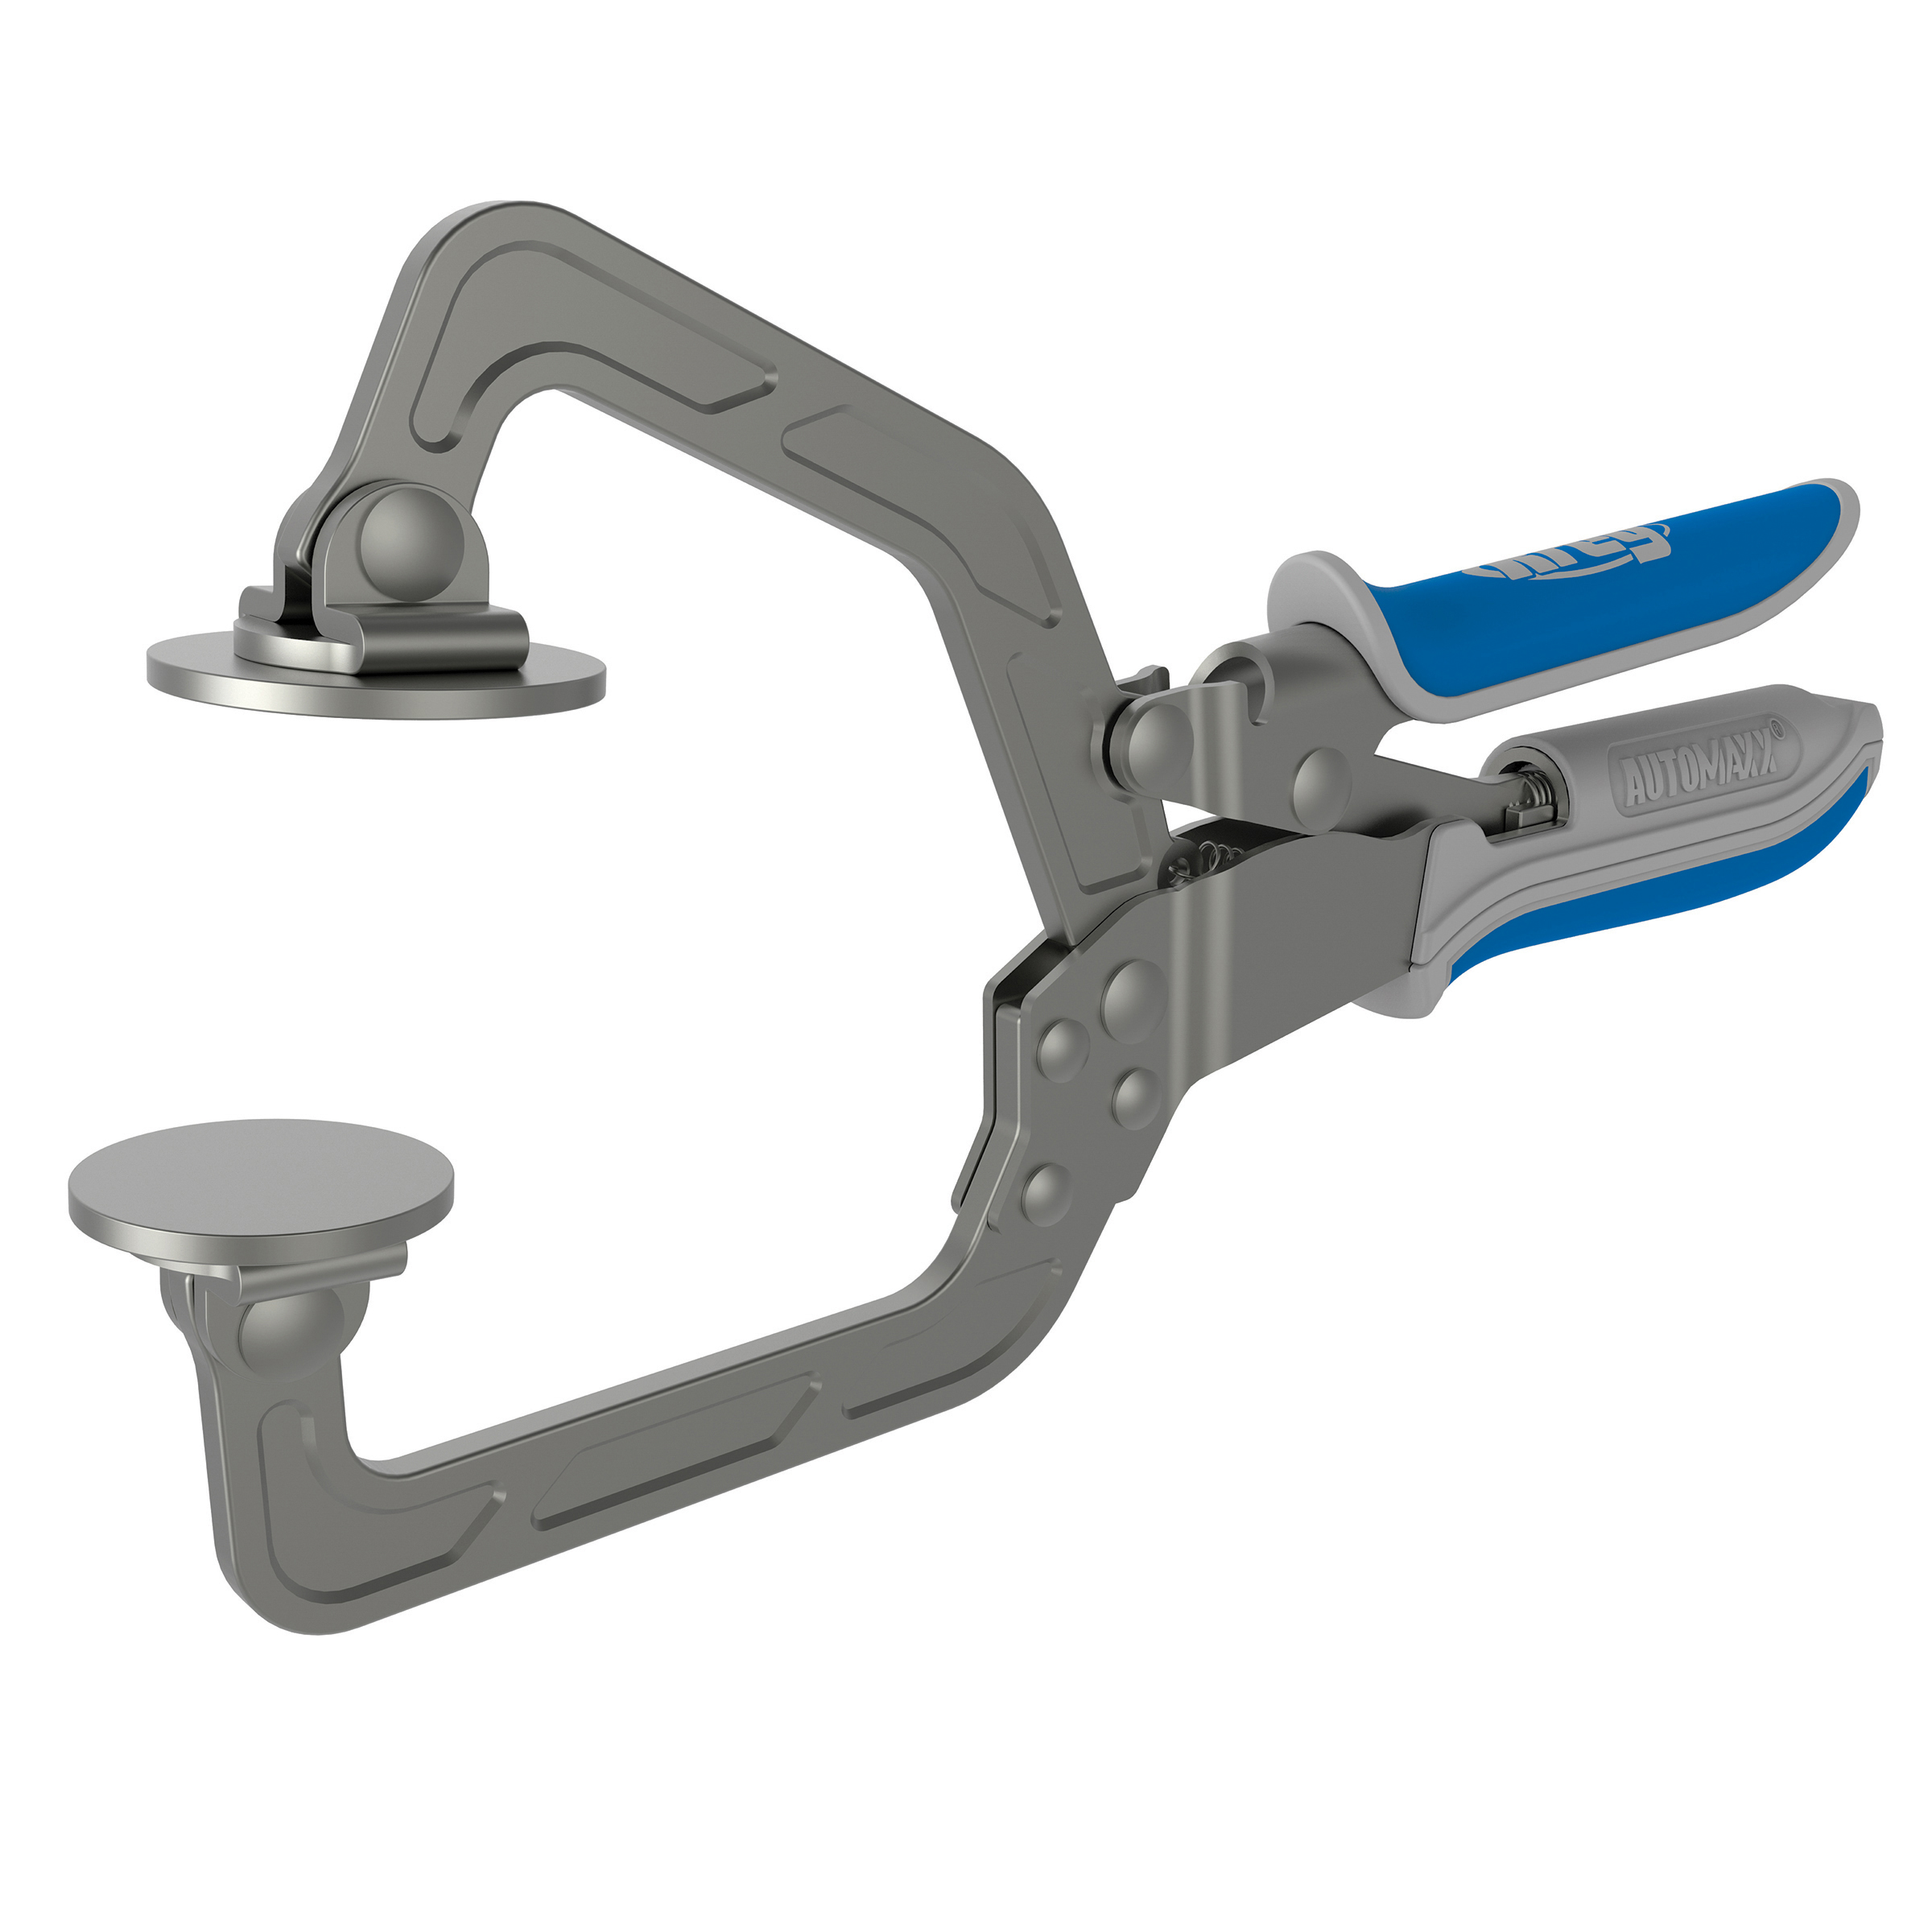
Set the Top against the Left Side as shown and secure the two pieces using 1 1/4" coarse-thread Kreg Pocket-Hole Screws. Now set the Divider in place against the Top and secure it with a couple clamps. Using a right-angle attachment on your drill, as well as a short driver bit, secure the Top to the Divider using 1 1/4" coarse-thread Kreg Pocket-Hole Screws.
-
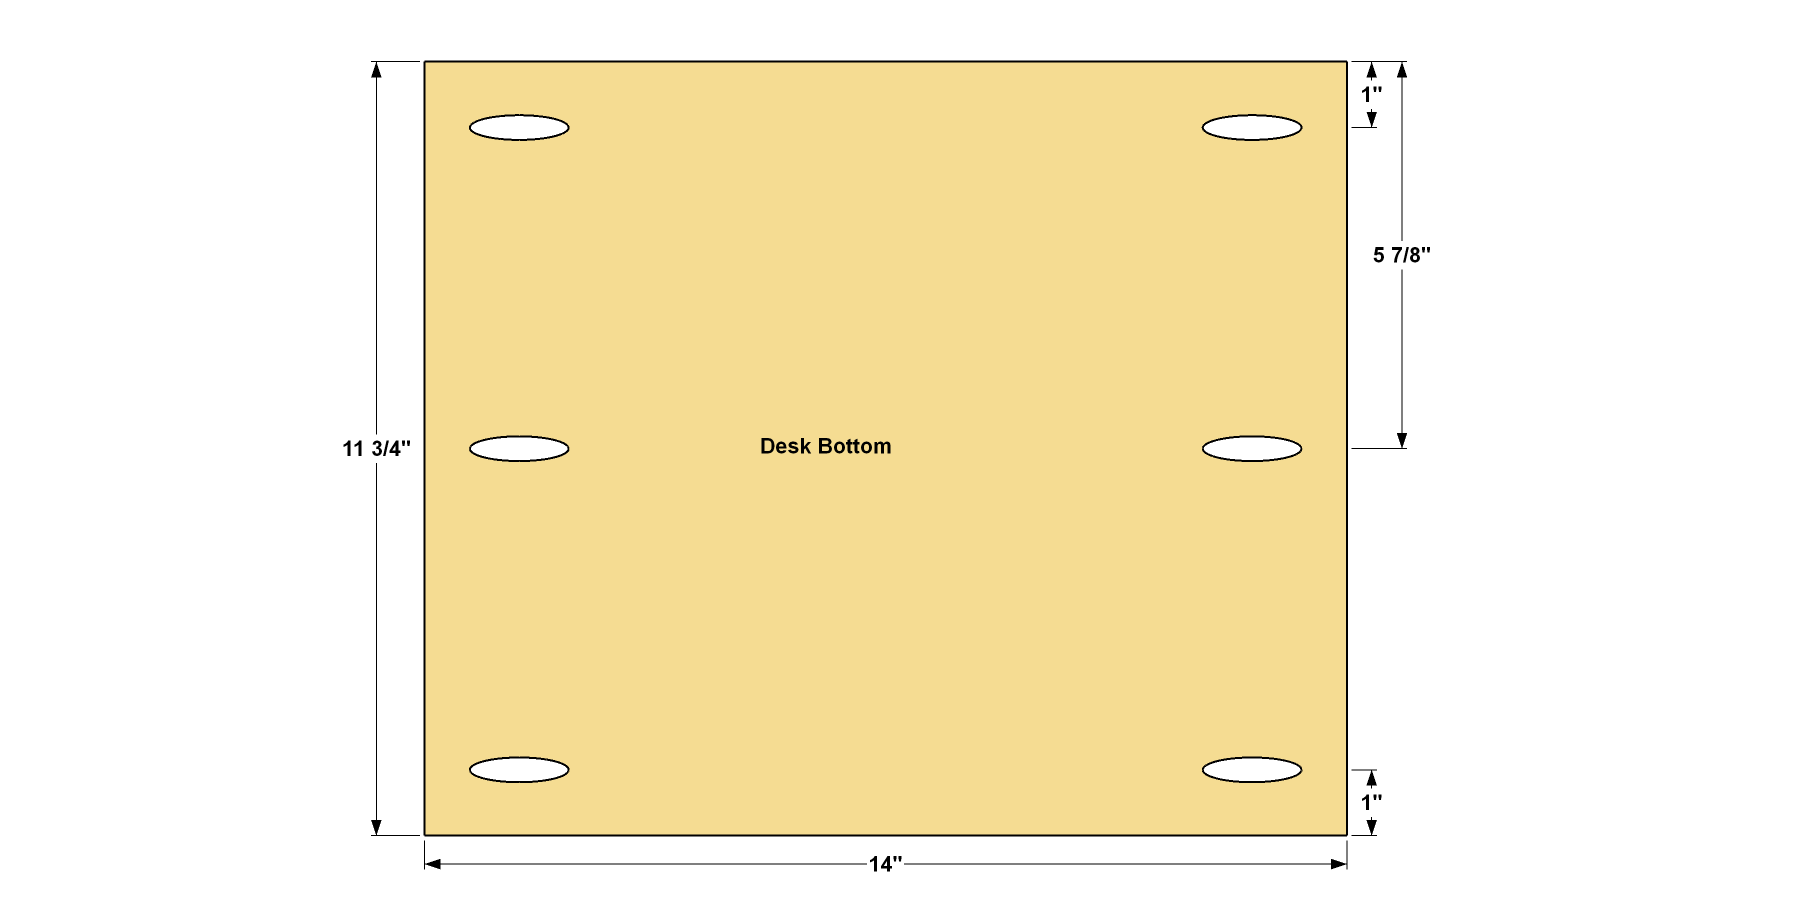
Make the Desk Bottom
Cut the Desk Bottom to size, as shown in the cutting diagram. Drill pocket holes where shown.
-
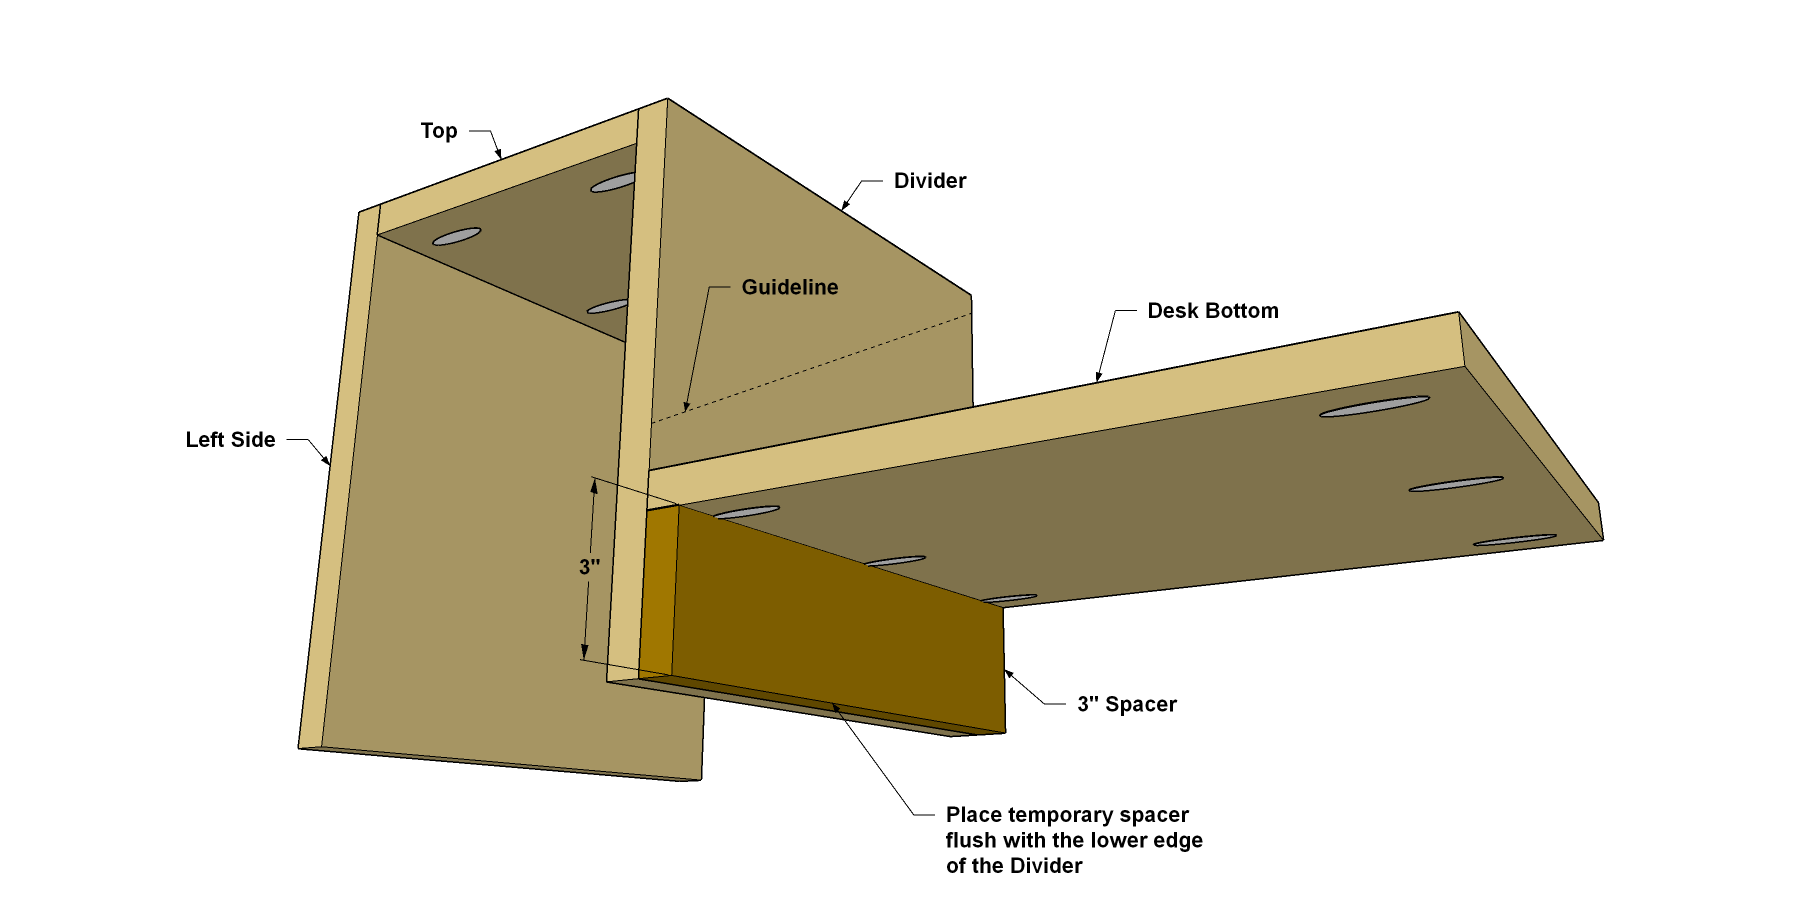
Attach the Desk Bottom
Cut a 3" Spacer to size from leftover plywood. Clamp the 3" Spacer to the outside of the Divider, as shown, making sure the spacer is flush with the lower edge of the Divider. Set the Desk Bottom on top of the Spacer, and then attach the Desk Bottom to the Divider using 1 1/4" coarse-thread Kreg Pocket-Hole Screws.
-
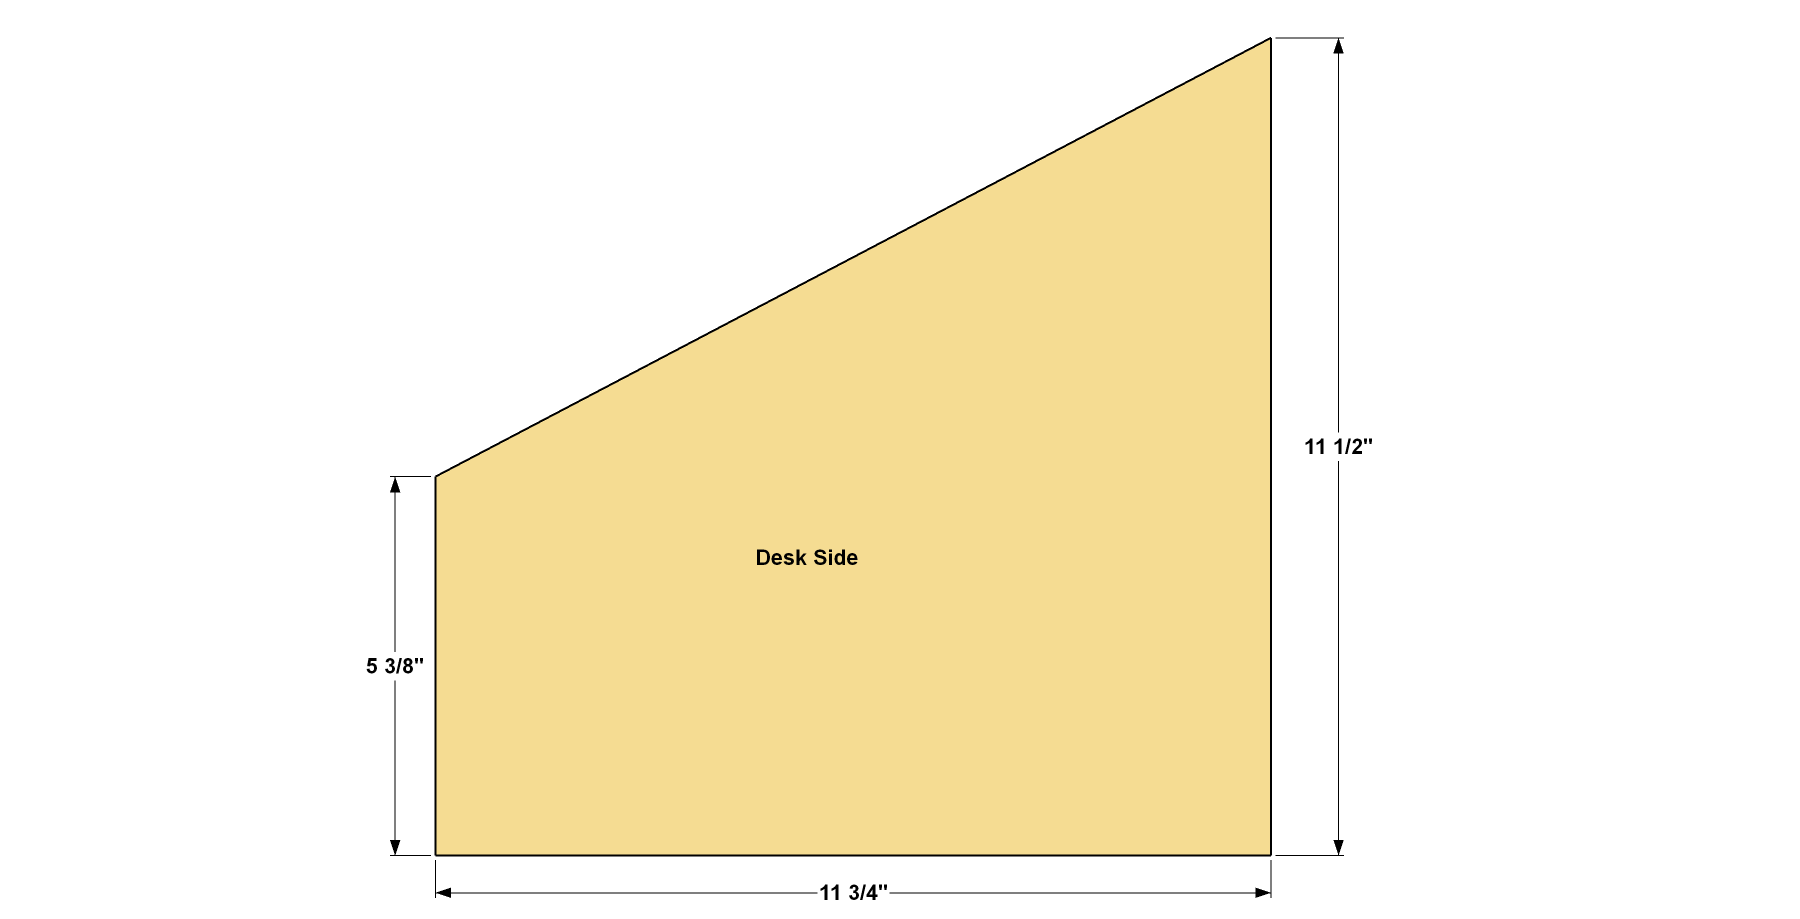
Make the Desk Side
Cut the Desk Side to size from 3/4" plywood, as shown in the cutting diagram. Next, lay out and cut the angle as shown. You can use a jigsaw to do this. Cut just on the waste side of the line, and then sand the cut edge smooth.
-
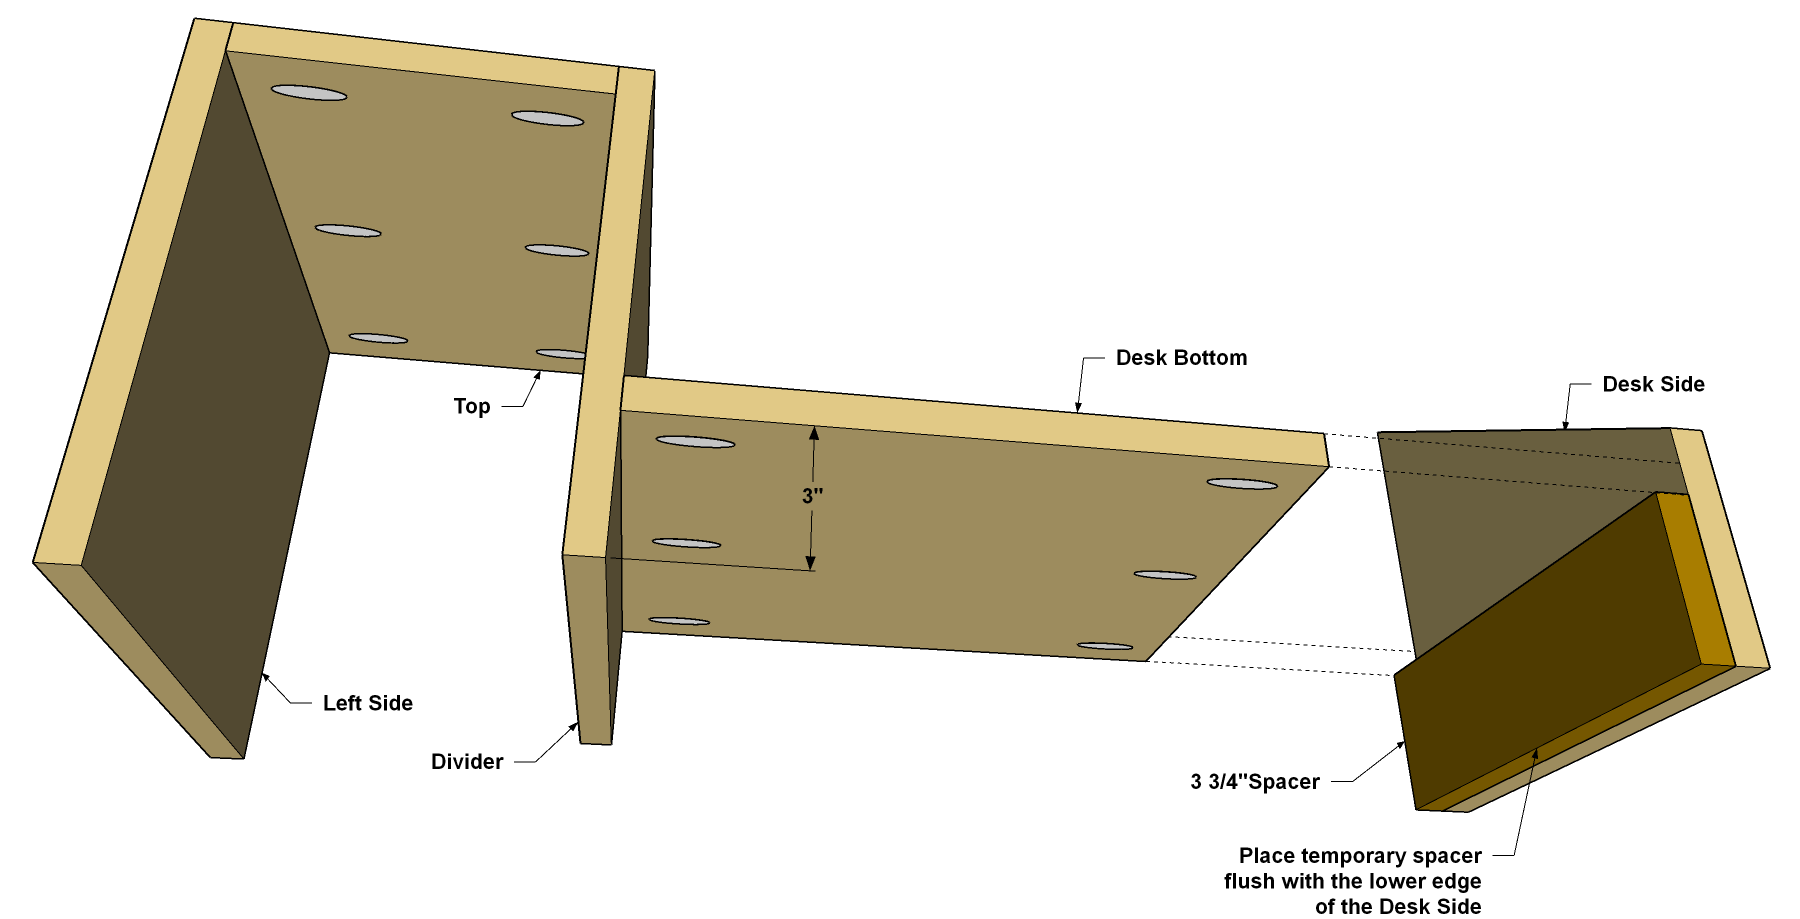
Attach the Desk Side
Cut a 3 3/4" Spacer from leftover plywood. Clamp this Spacer to the Desk Side, as shown, so that the lower edge of the spacer is flush with the lower edge of the Desk Side. Set the Desk Bottom on the Spacer, and then attach the Desk Bottom to the Desk Side using 1 1/4" coarse-thread Kreg Pocket-Hole Screws.
-
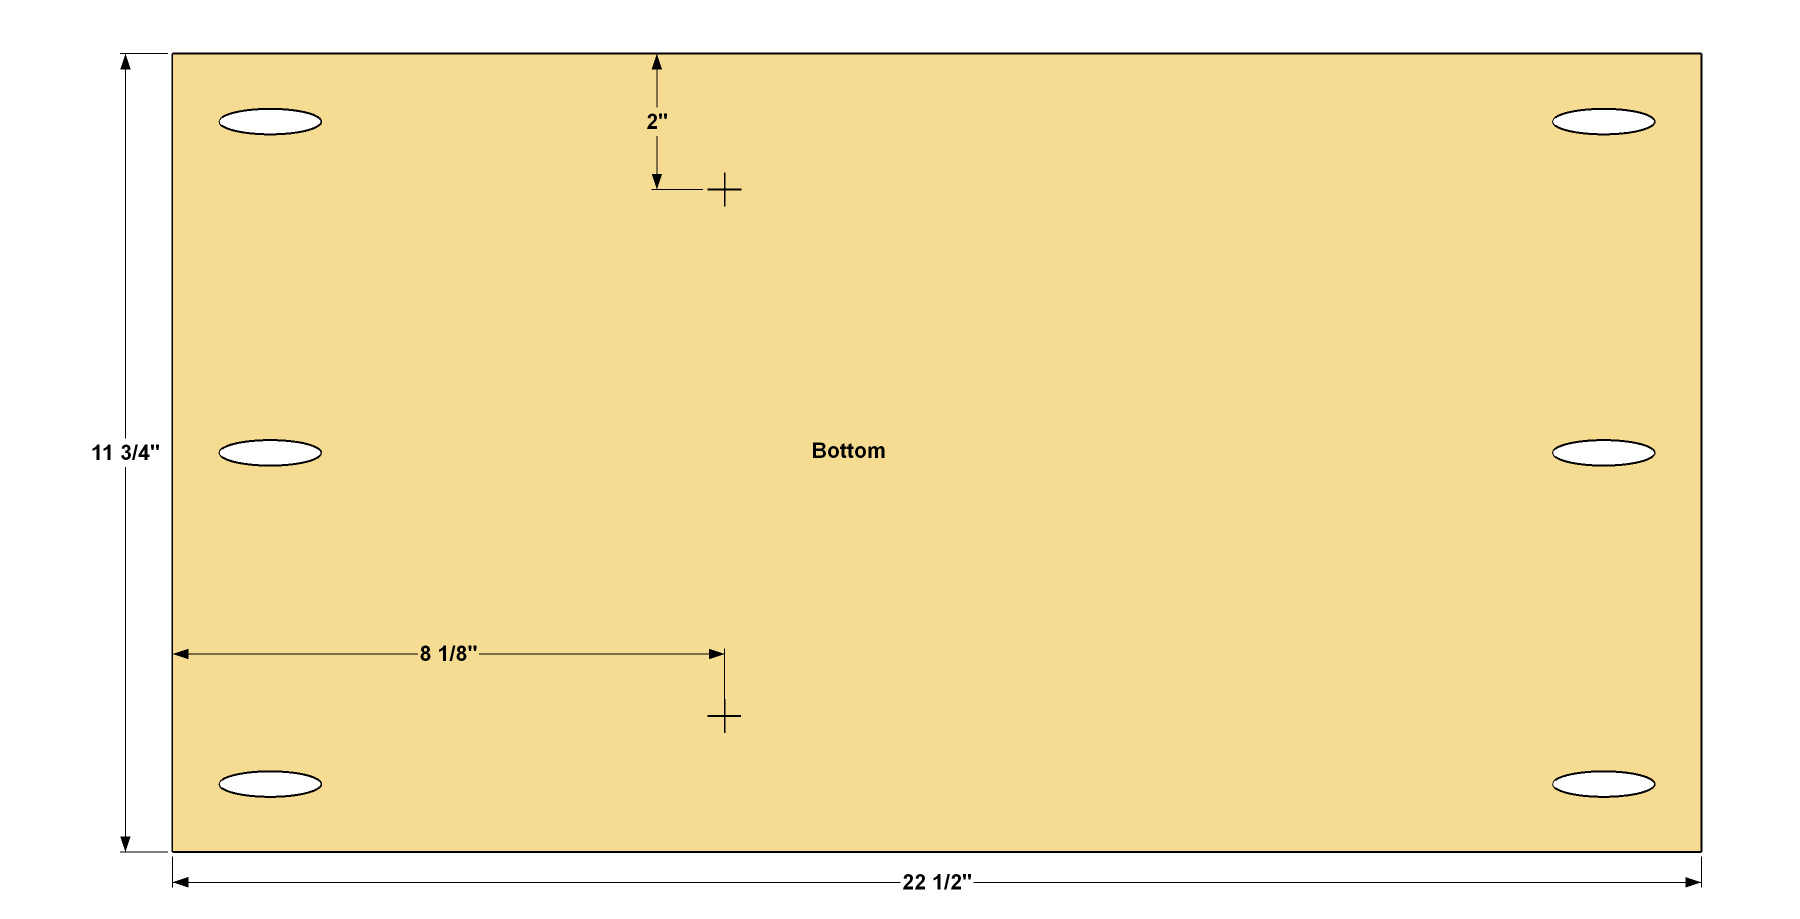
Make the Bottom
Cut the Bottom to size from 3/4" plywood, as shown in the cutting diagram. Drill pocket holes at the locations shown. Also drill two pilot holes for #8 screws at the locations shown. These will be used in the next step for attaching the Bottom to the Divider.
-
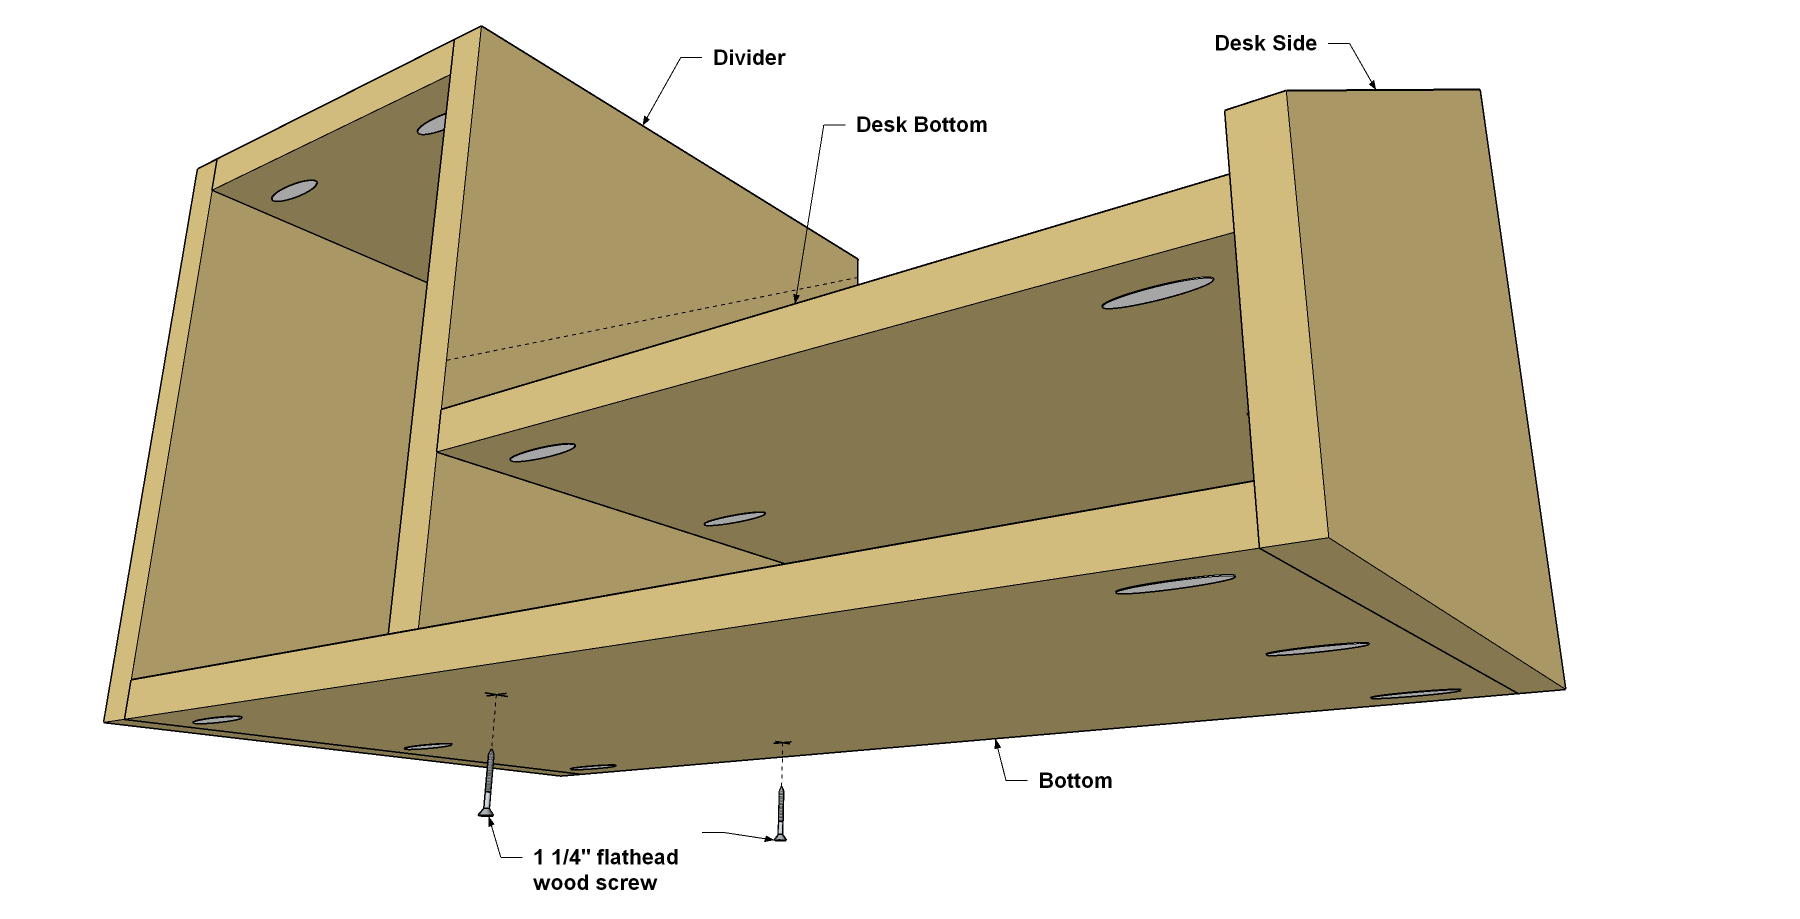
Attach the Bottom
Set the Bottom in place between the Left Side and the Desk Side. Make sure the front edges of the parts are flush. Attach the Bottom to the Left Side and the Desk Side using 1 1/4" coarse-thread Kreg Pocket-Hole Screws. To secure the Divider, use the holes in the Bottom as guides and drill 1/16 pilot holes into the Divider’s lower edge. Then drive two 1 1/4" flathead wood screws through the Bottom and into the Divider.
-
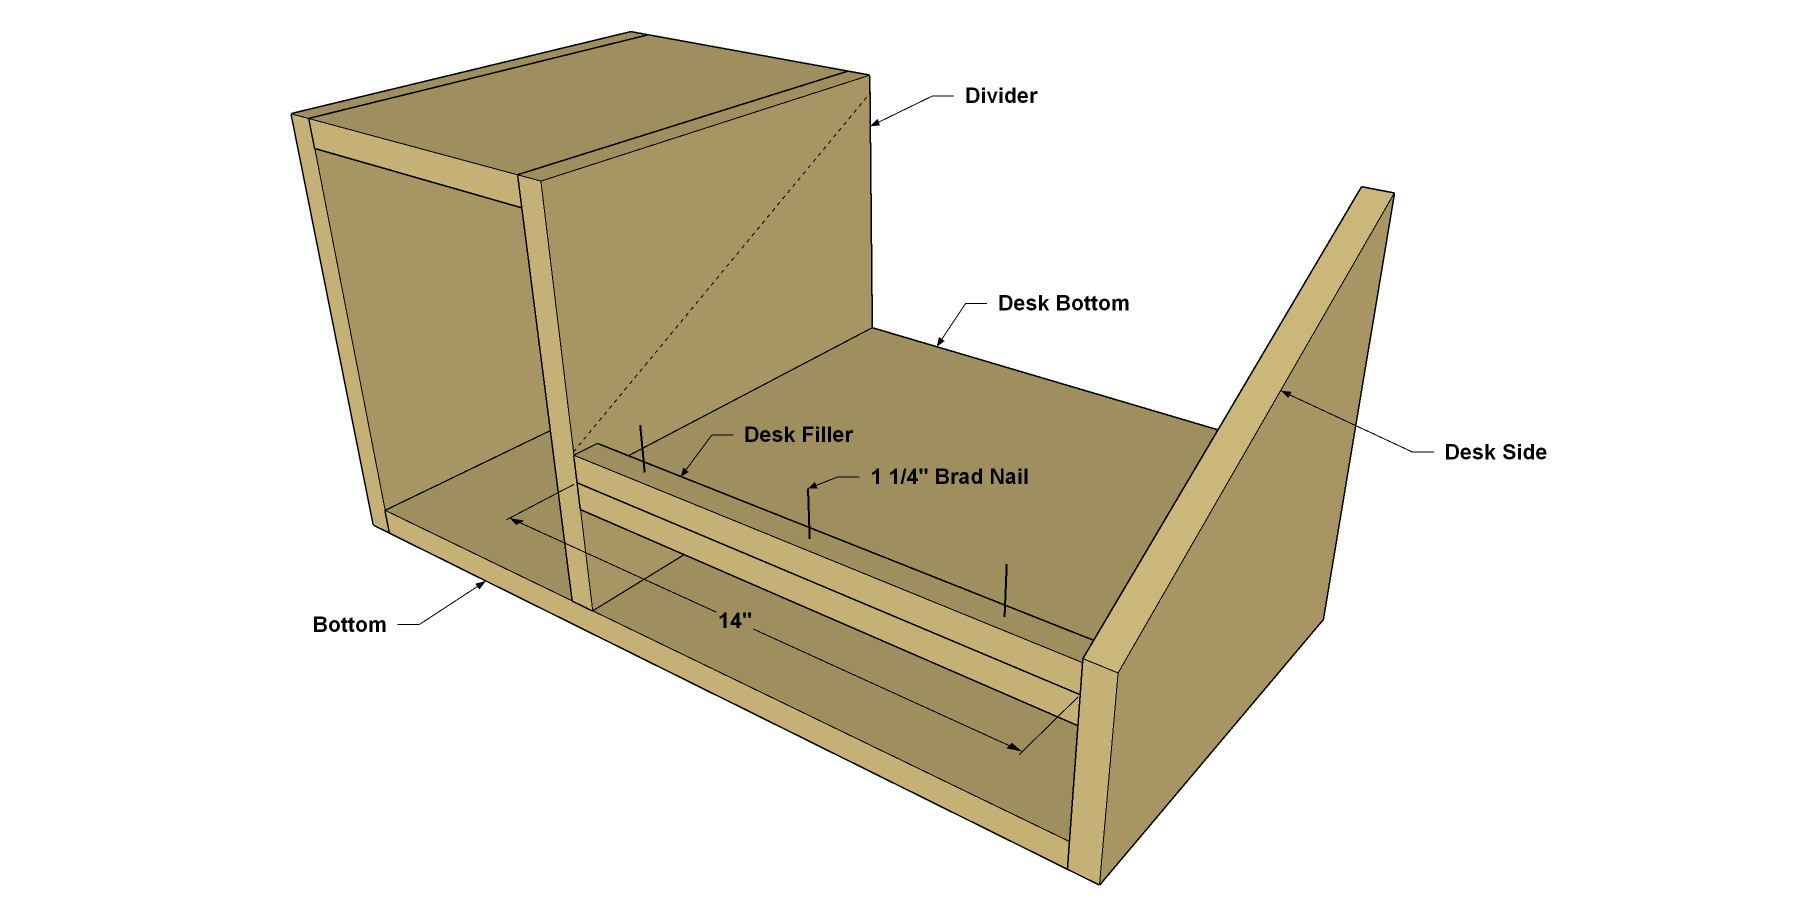
Make and Mount the Desk Filler
Cut the Desk Filler to length from a 3/4" square dowel, as shown in the cutting diagram. Add a couple dabs of glue on one face of the Filler, set it in place, and secure it with a few 1 1/4" brads. If you have a brad nailer, it’s the easiest way to attach the Filler. If you don’t have a brad nailer, drill pilot holes to prevent splitting, and then drive in nails using a hammer.
-
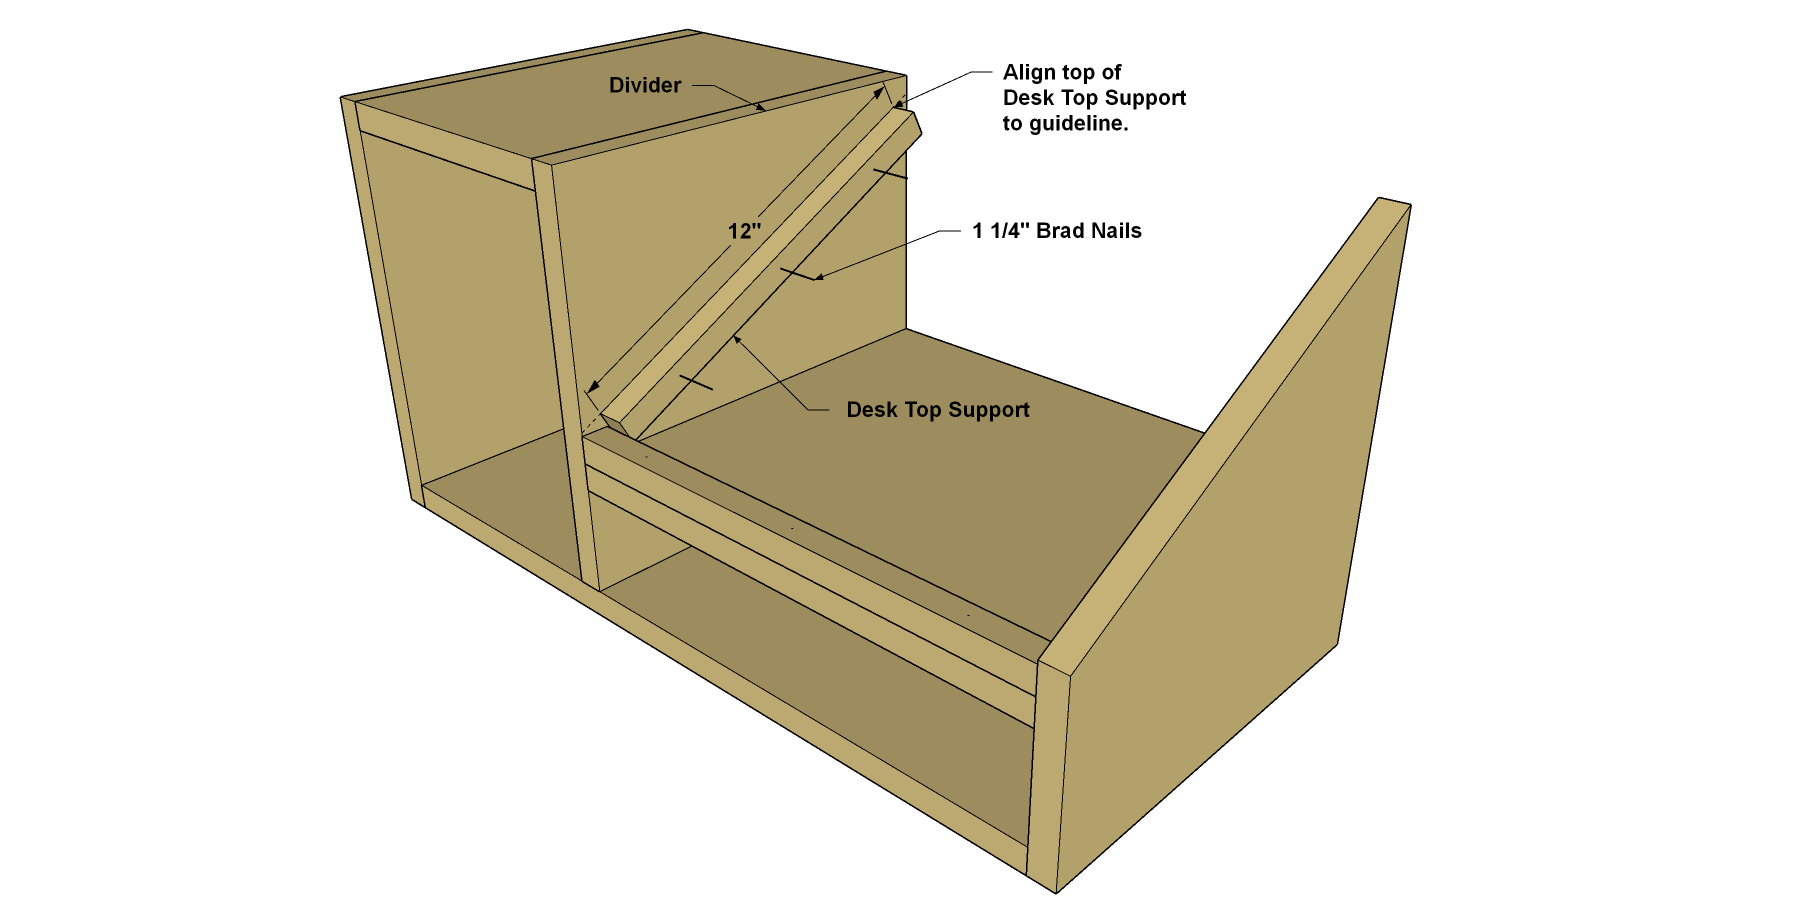
Add a Desk Top Support
Cut the Desk Top Support to length from 3/4" square dowel, as shown in the cutting diagram. Apply glue to one face, and then align it to the guideline on the Divider, as shown. Attach the Desk Top Support using 1 1/4" brad nails.
-
Make the Desk Top
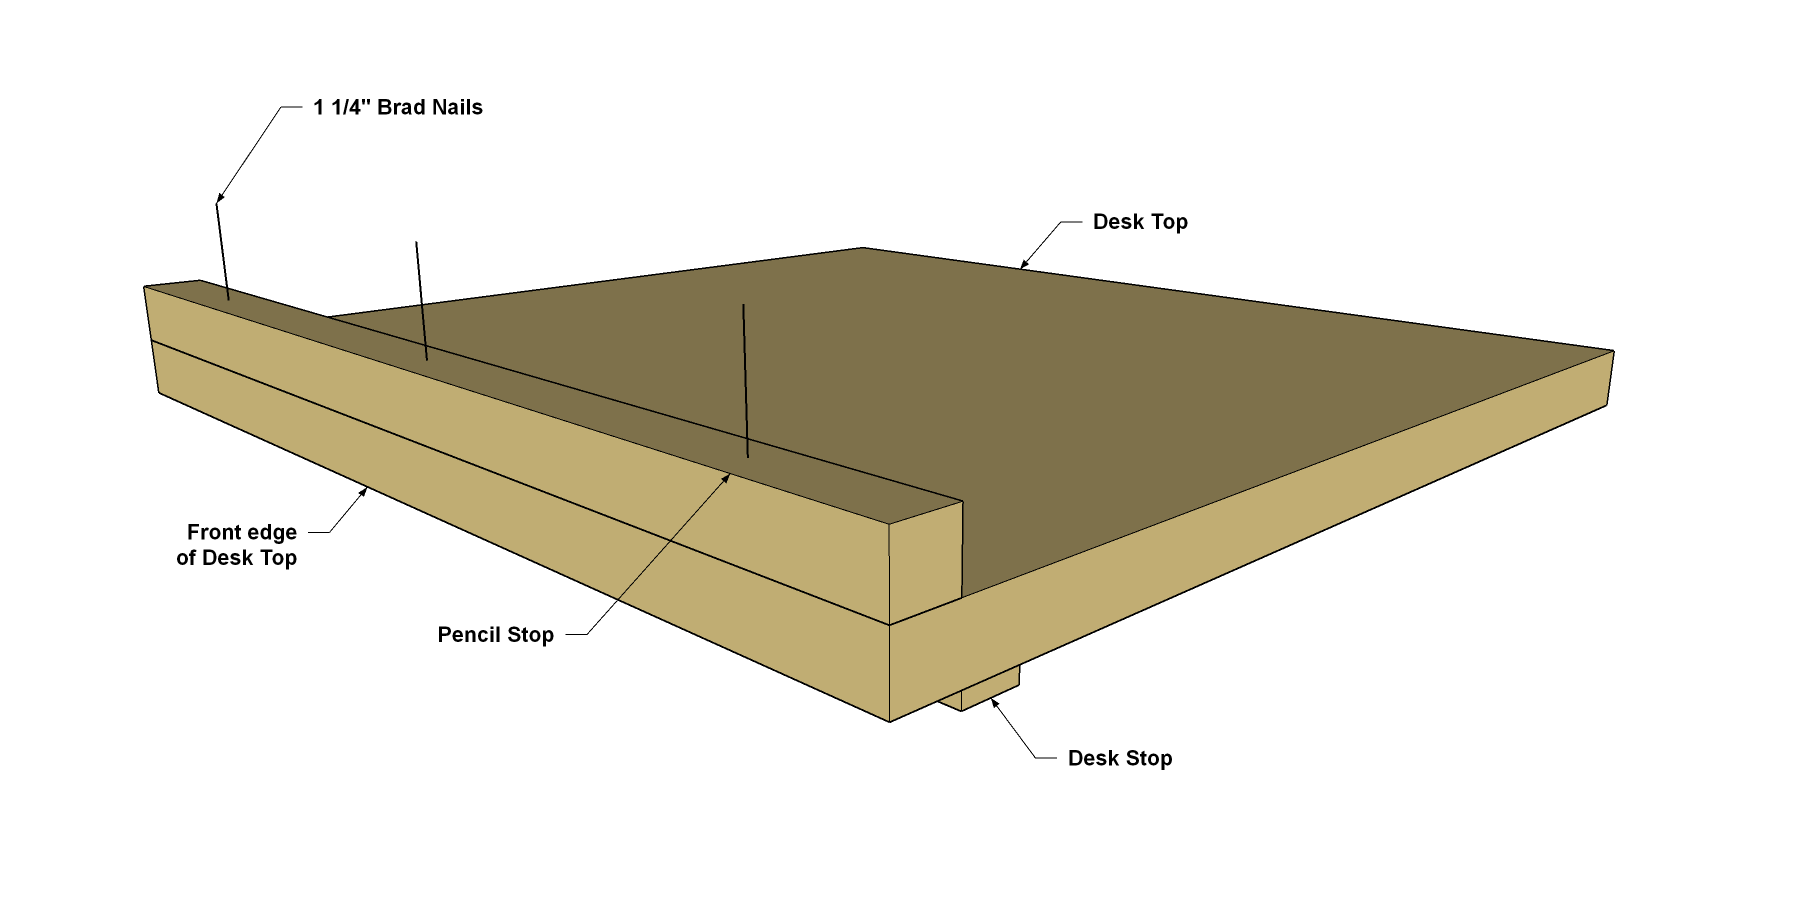
Cut a Desk Top to size from a 3/4" plywood, and cut a Desk Stop from a 3/4" square dowel, as shown in the cutting diagram. Apply glue and then position Desk Stop where shown on the underside of the Desk Top. Secure it with 1 1/4" brads.

-
Add a Pencil Stop
Cut the Pencil Stop to length from a 3/4" square dowel, as shown in the cutting diagram. Glue and nail the Pencil Stop to the face of the Desk Top at the location shown.
-
Cut the Frame Pieces
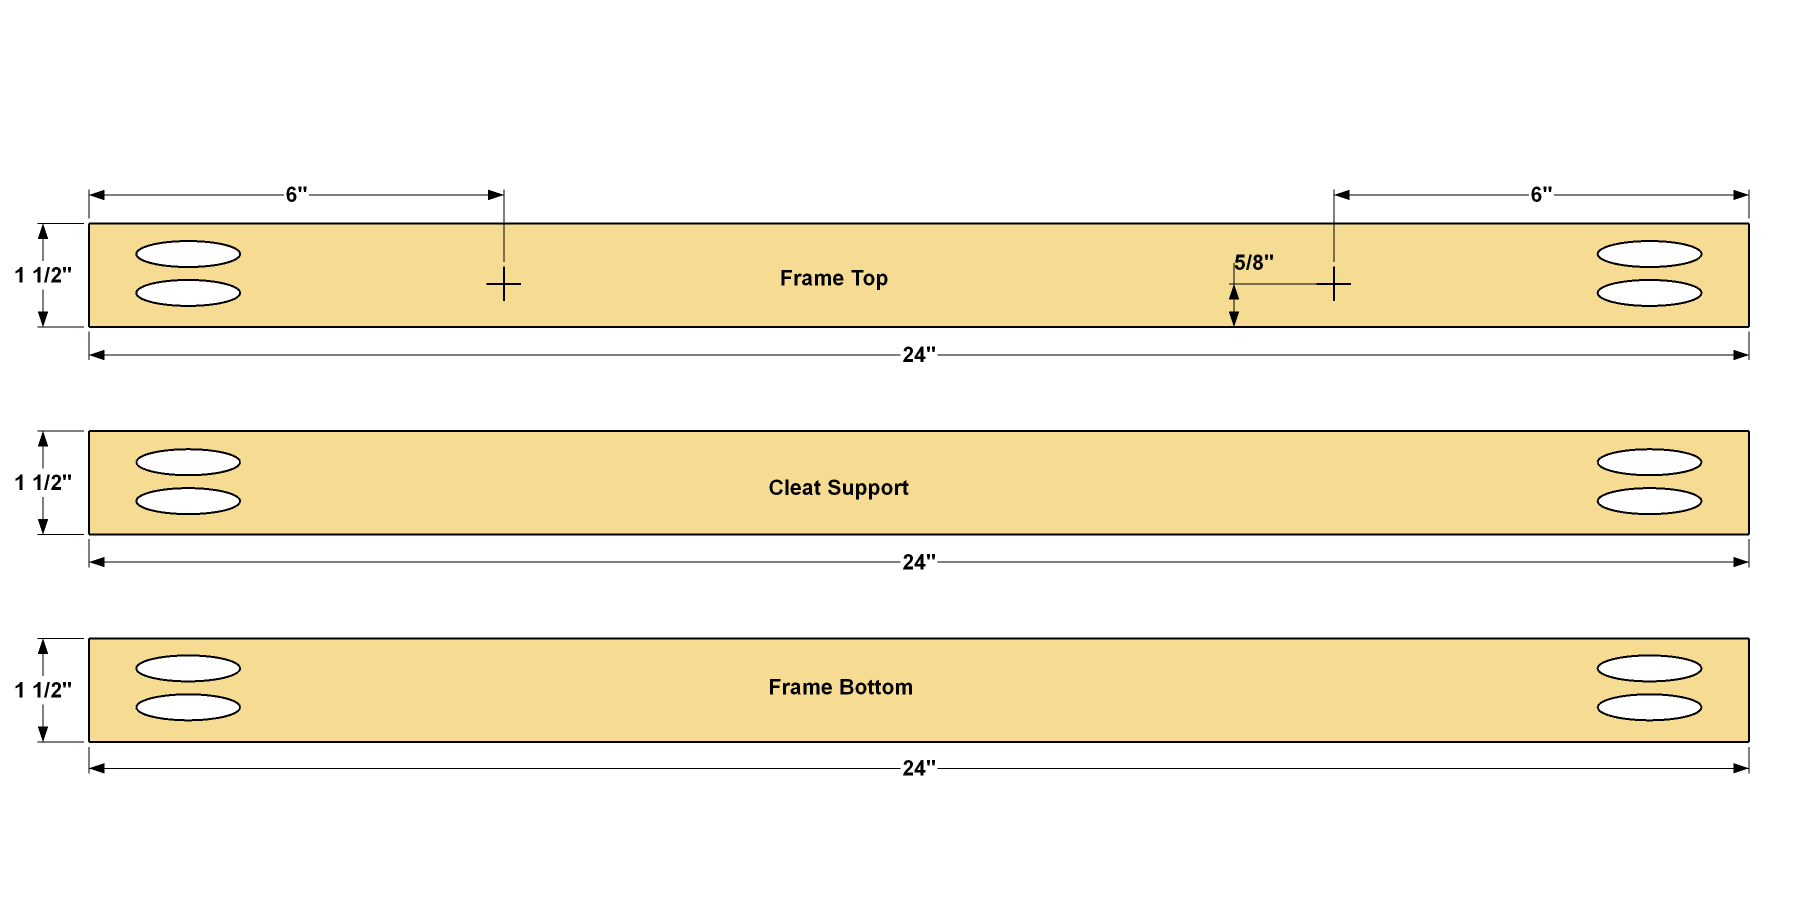
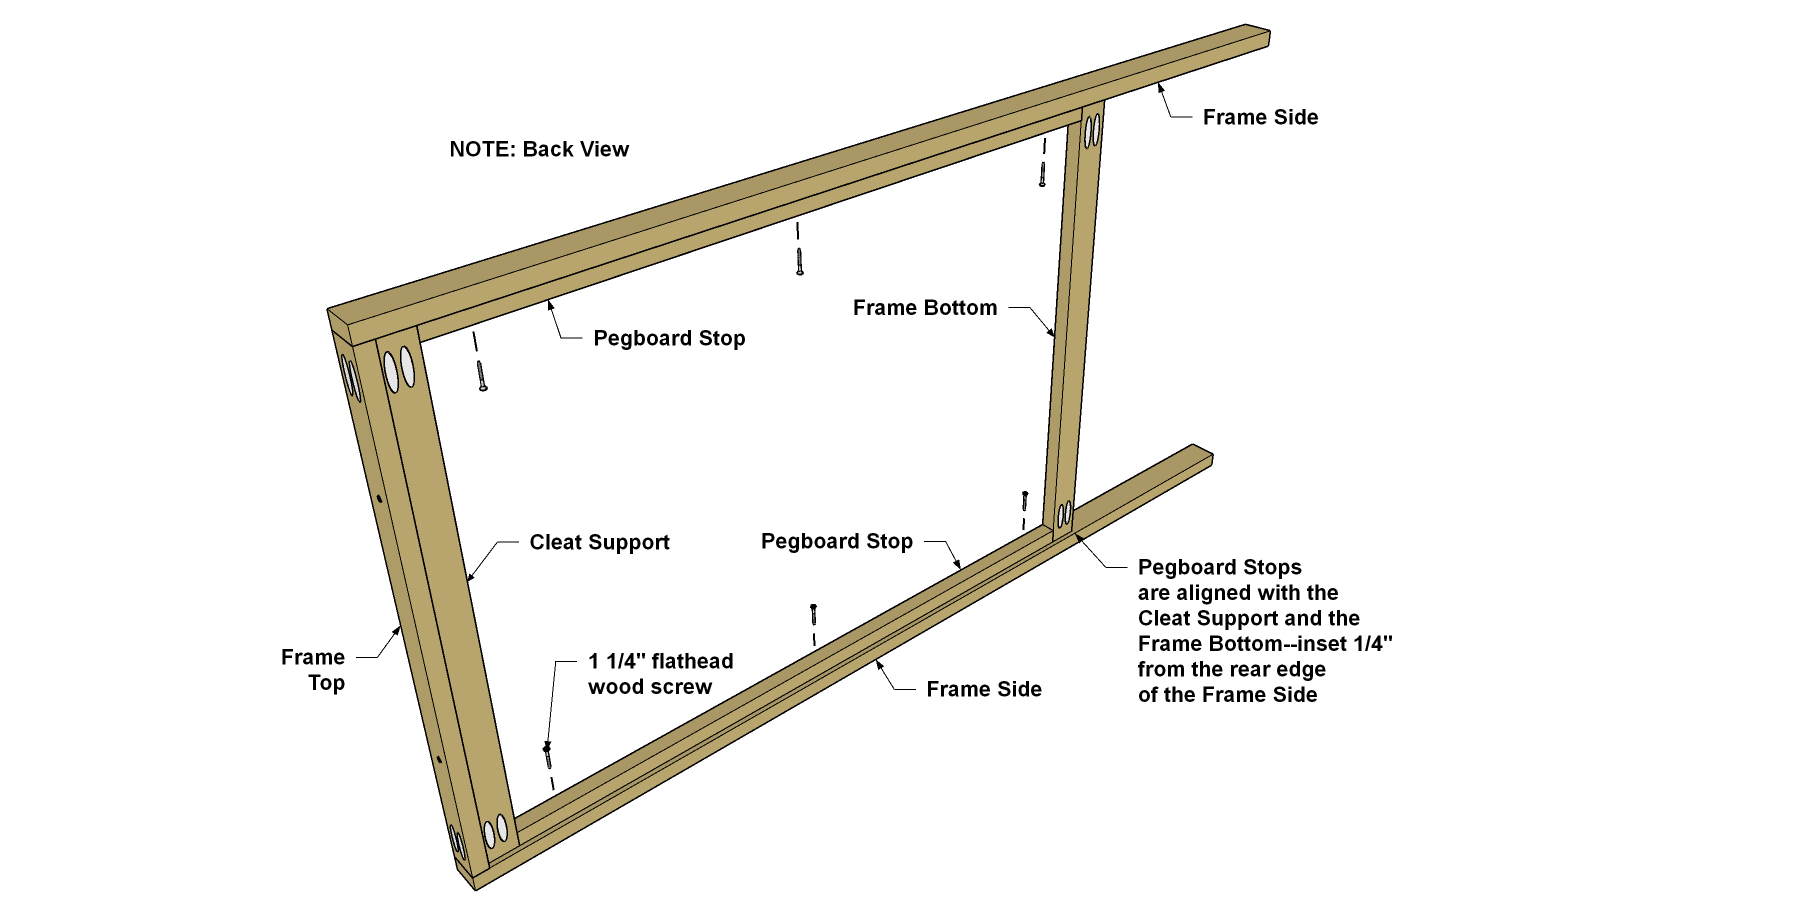
From 1x2 boards, cut one Frame Top, one Frame Bottom, one Cleat Support and two Frame Sides to length, as shown in the cutting diagram. On the Frame Top, Bottom and Cleat Support, drill pocket holes at the locations shown. The Frame Top also gets two pilot holes drilled at the locations shown.
-
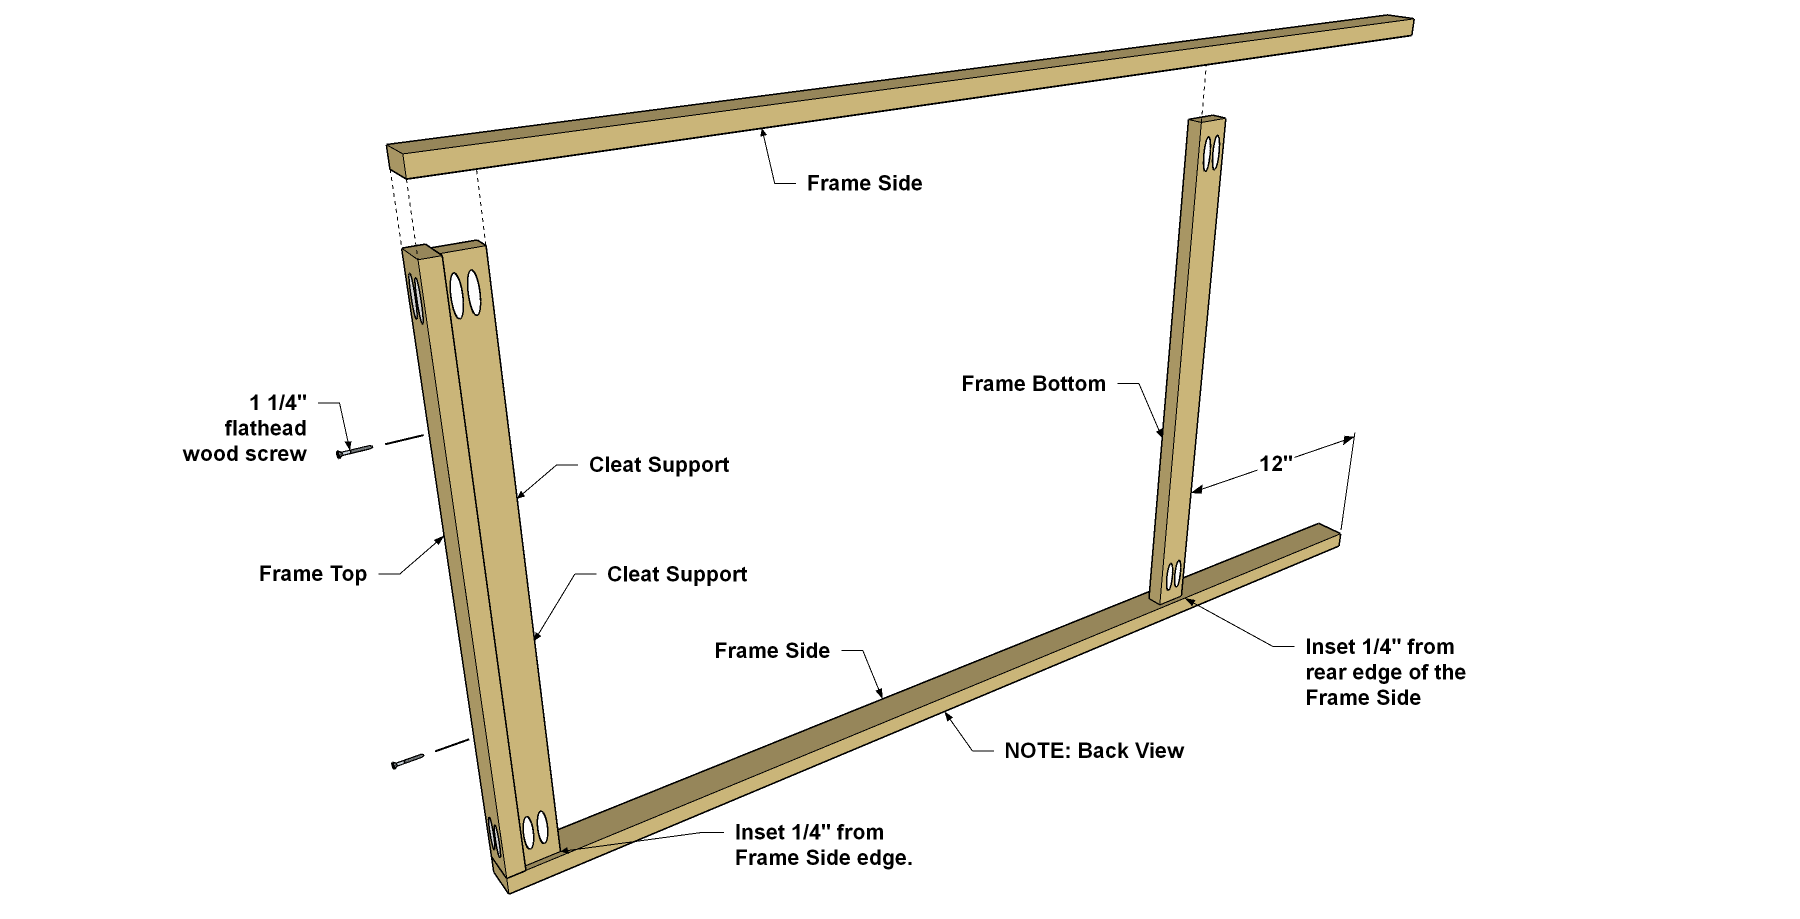
Assemble the Frame
Secure the Frame Top to the Frame Sides using 1 1/4" coarse-thread pocket-hole screws. Place the Cleat Support in position as shown, making sure it is inset 1/4" from the rear edges of the frame. Attach the Cleat Support to the Frame Sides using 1 1/4" coarse-thread pocket-hole screws. Now attach the Frame Top to the Cleat Support with two 1 1/4" flat head wood screws. Next, position the Frame Bottom as shown with the same 1/4" inset as the Cleat Support. Secure it to the Frame Sides using 1 1/4" coarse-thread pocket-hole screws.
-
Add Pegboard Stops
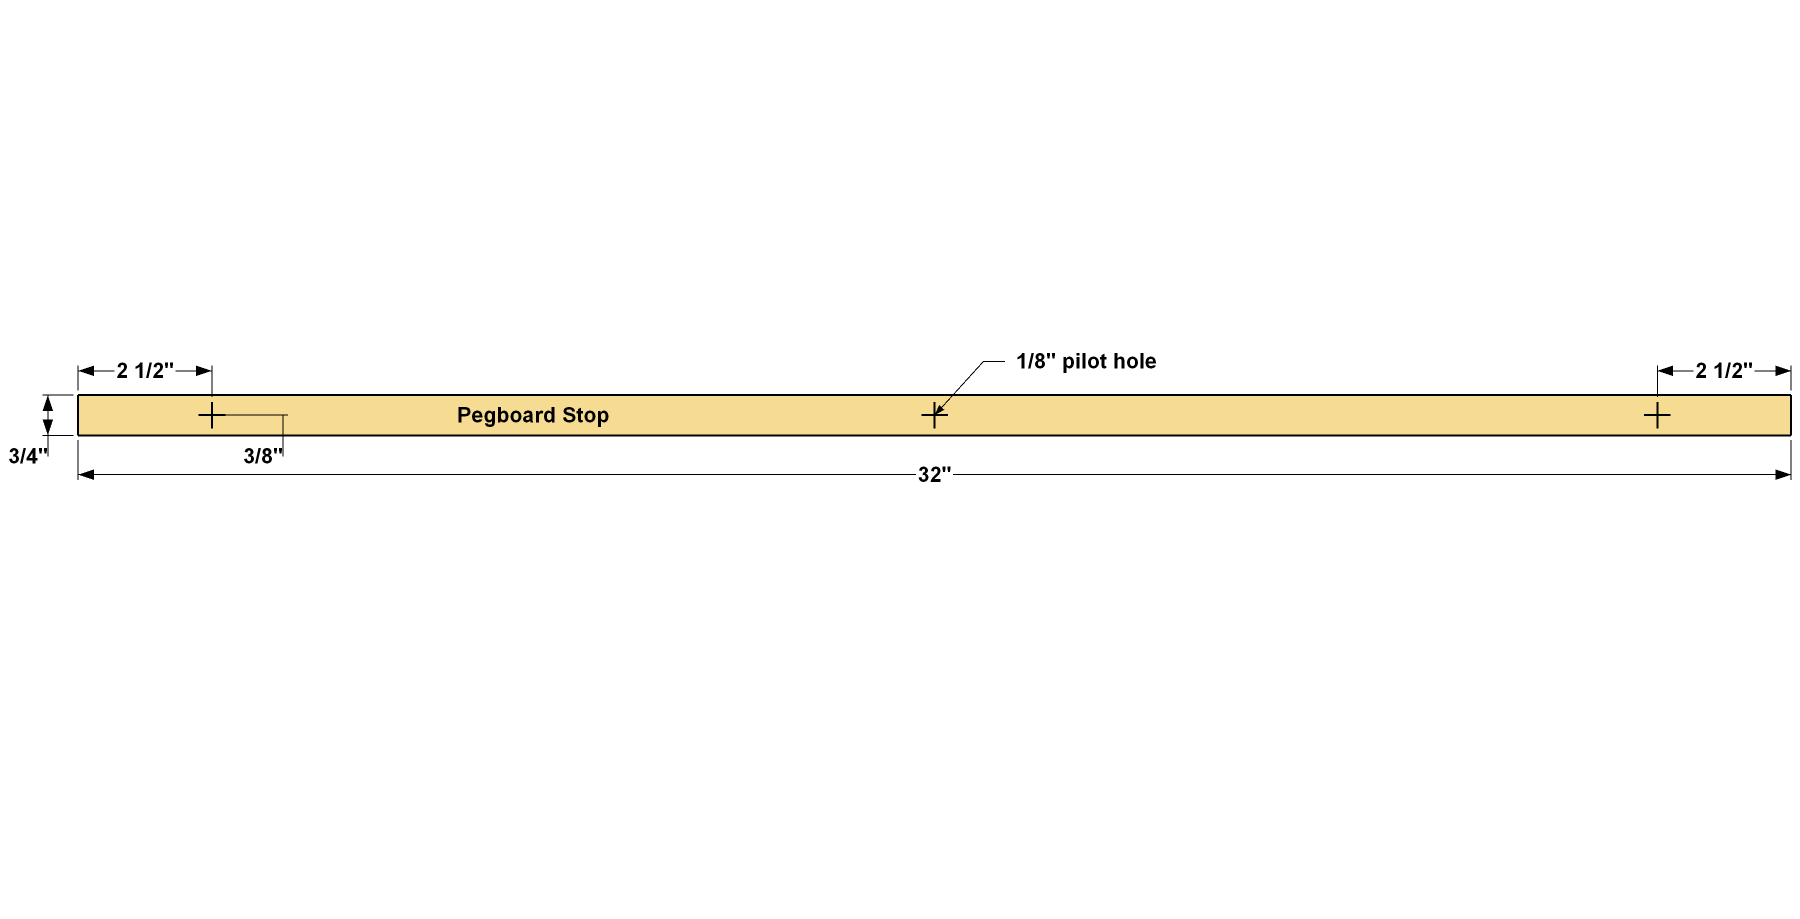
Cut two Pegboard Stops to length from 3/4" square dowel, as shown in the cutting diagram. Drill three pilot holes on each Stop for #8 flathead wood screws.
-
Attach the Stops to the Frame
Spread glue on one face of each Pegboard Stop, and then align the Stops with the Cleat Support and the Frame Bottom, as shown. Attach the Pegboard Stops to the Frame Sides using 1 1/4" flathead wood screws.
-
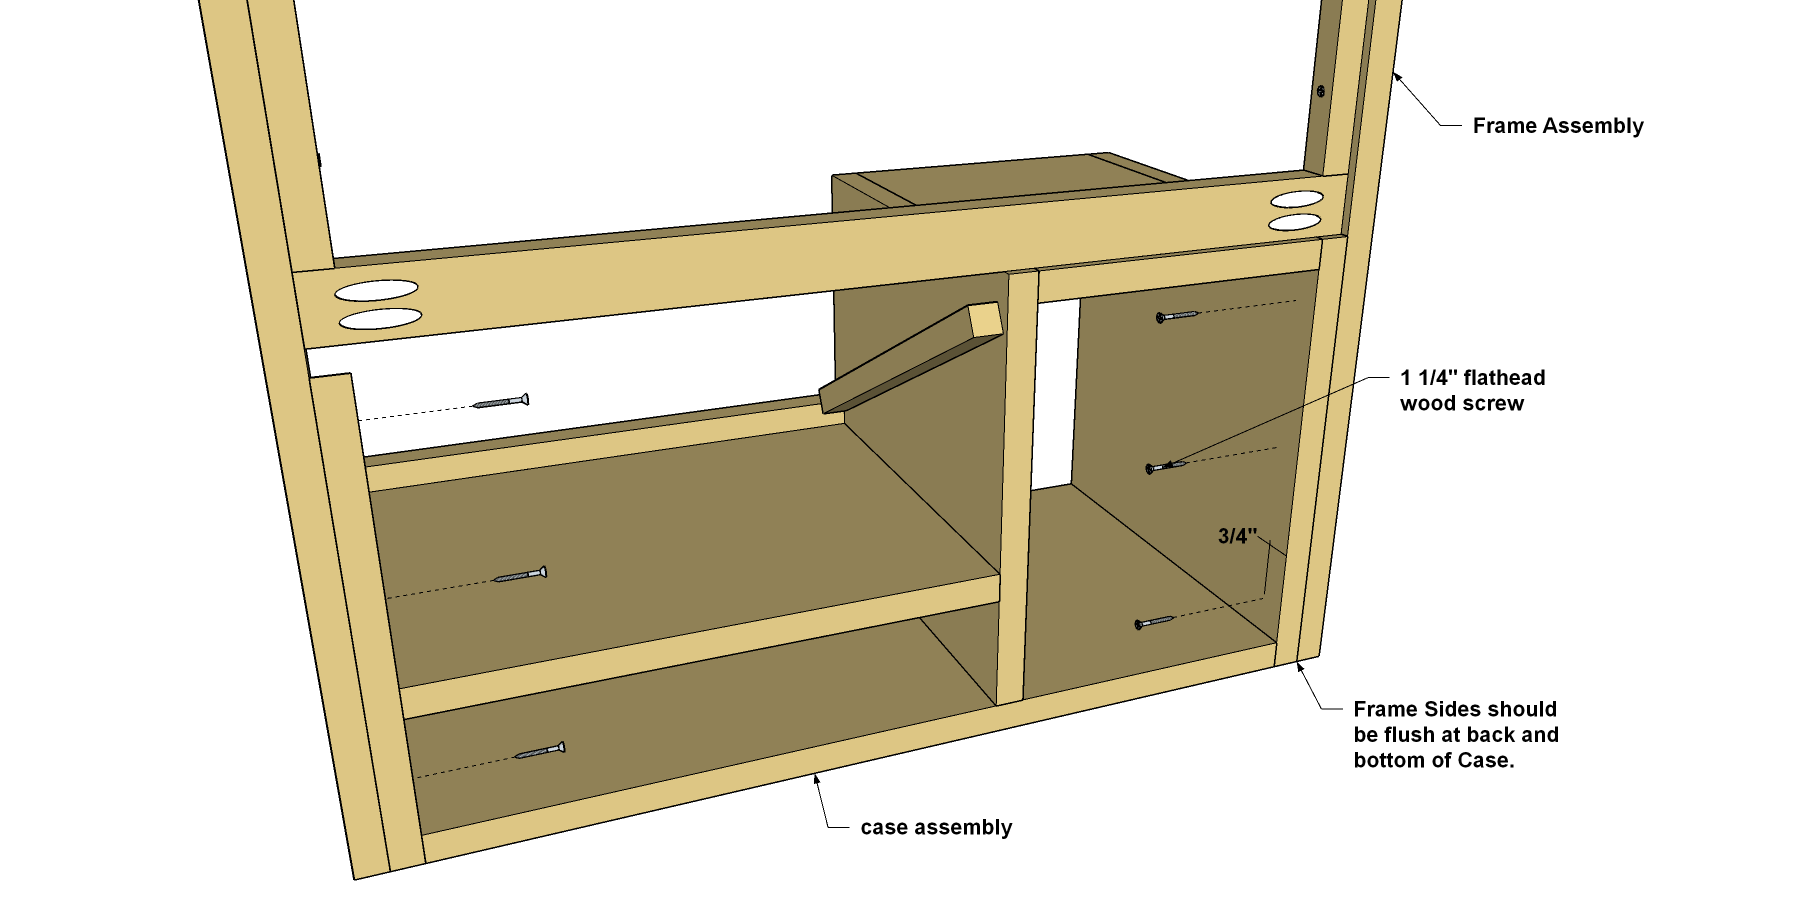
Attach the Frame to the Case
Set the frame assembly in position, as shown, so that the Frame Sides are flush with both the back and bottom of the case. Drill pilot holes, and then secure the frame assembly to the case using 1 1/4" flathead wood screws.
-
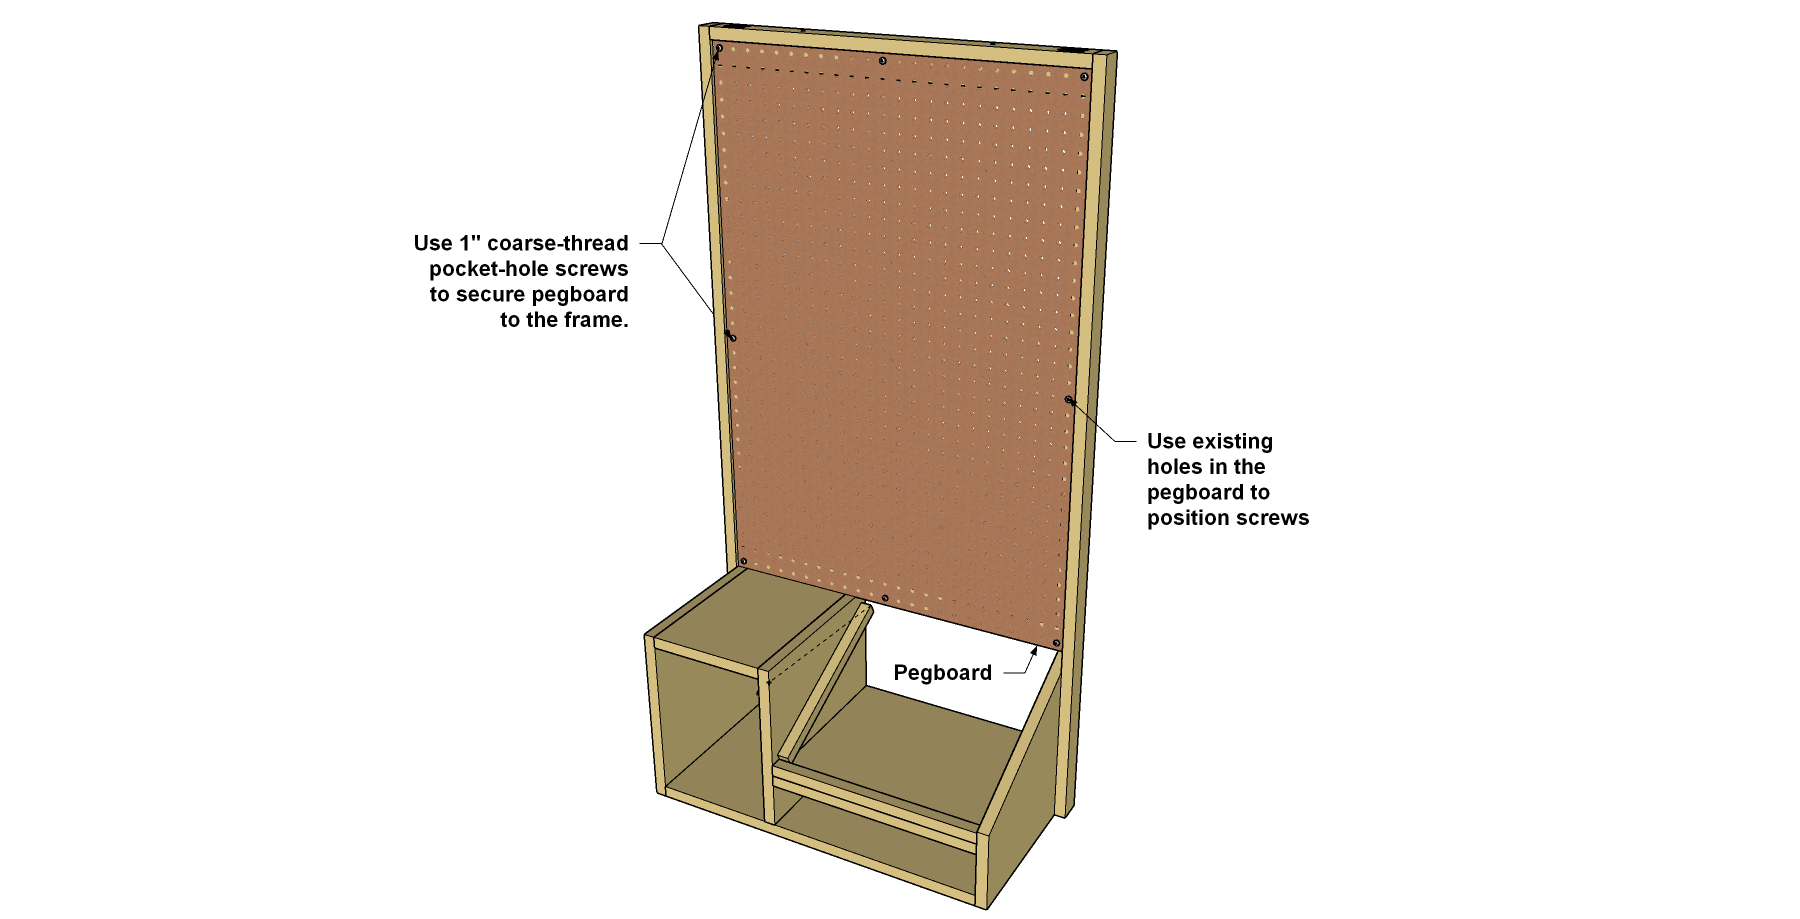
Add the Pegboard
Cut the Pegboard to the size, as shown in the cutting diagram. Set the Pegboard into the frame and secure it to the Pegboard Stops with 1" coarse-thread Kreg Pocket-Hole Screws at the locations shown.
-
Add Finish and Install
Finish the storage center with a coat or two of oil to protect it and add a bit of color. To hang the storage center, we used a “Hangman” hanging bracket. This two-piece system is simple to use and strong. You can find Hangman hangers in home centers and online. Mount one half of the system to the Cleat Support and the other half to the wall following the manufacturer’s instructions. Then you can hang the storage center on your wall, and get your tools organized for your next project.